QuickRun
- Docker
- Docker! Why
- Install Docker
- How to link multiple docker-compose services via network
- Usefull commands
- Interesting Articles
- Docker SPA
- Setting up Docker in Docker (dind/socket) with GitLab Runners
- Docker Compose Generator
- Python
- Download Broadcom VMWare Hypervisors
- ZLib
- LINUX for Today
- Running out of inodes
- Extend Ubuntu Disk
- Logical Volume Manager - LVM
- rm -rf root permissions denied
- Wireguard
- Nginx Tunning
- User RDP SSH
- VestaCP/HestiaCP Commands
- Register New Gitlab Runner (Docker-in-Docker)
- MinIO Client Operation
- Hardware
- Bloodhound Linux/Docker Quickstart
- Clone ESXi VMs
- USB Drive Read-Only Setup Guide
- Programming Notes for Professionals books
- Top 25 Penetration Testing Skills and Competencies (Detailed)
- LLMs Localy
- Logon Remote MSSQL via Windows Account
Docker
Docker! Why

Docker containers have become the de facto development standard, but it's worth mentioning that Docker wasn't the first player in the container world.

Install Docker
Quick Install
curl -fsSL https://get.docker.com | bash
sudo groupadd docker
sudo usermod -aG docker $USER- https://docs.docker.com/get-started/docker_cheatsheet.pdf
- https://dockerlabs.collabnix.com/docker/cheatsheet/
How to link multiple docker-compose services via network
This scenario came from a question I was asked docker-compose and network connectivity between services defined in different docker-compose.yml files.
The desired result was to be able to define a docker-compose.yml in one file, and in a second docker-compose.yml have the ability to reach the first service via service or container name for development purposes.
Default scenario: Two separate docker-compose.yml and two separate default networks
Let’s take a simple docker compose file.
version: '3'
services:
service1:
image: busybox
command: sleep infinity
When it starts up, a default network is created. Its name is based on the service name and the directory name of the docker-compose.yml file.
$ pwd
/tmp/docker-example/compose1
$ docker-compose up -d
Creating network "compose1_default" with the default driver
Creating compose1_service1_1 ... done
Second docker compose file
version: '3'
services:
service2:
image: busybox
command: sleep infinity
Starting services in a second docker compose file, we see the same behavior. A new default network is created and used.
$ pwd
/tmp/docker-example/compose2
$ docker-compose up -d
Creating network "compose2_default" with the default driver
Creating compose2_service2_1 ... done
A side-effect of these isolated networks are that the containers are unable to ping one another by service name or container name.
Test: From Service 1 ping Service 2
# By service name
$ docker exec -it compose1_service1_1 ping service2
ping: bad address 'service2'
# By container name
$ docker exec -it compose1_service1_1 ping compose2_service2_1
ping: bad address 'compose2_service2_1'
Test: Service 2 ping Service 1
# By service name
$ docker exec -it compose2_service2_1 ping service1
ping: bad address 'service1'
# By container name
$ docker exec -it compose2_service2_1 ping compose1_service1_1
ping: bad address 'compose1_service1_1'
New scenario: Sharing a network between services
If you want define services in multiple docker-compose.yml files, and also have network connectivity between the services, you need to configure your services to use the same network.
To create an external network, you can run docker network create <name>. -- where <name> can be a single string without spaces.
Creating the network
$ docker network create external-example
2af4d92c2054e9deb86edaea8bb55ecb74f84a62aec7614c9f09fee386f248a6
Modified first docker-compose file with network configured
version: '3'
services:
service1:
image: busybox
command: sleep infinity
networks:
default:
external:
name: external-example
Restarting the services
$ pwd
/tmp/docker-example/compose1
$ docker-compose up -d
Creating compose1_service1_1 ... done
Modified second docker-compose file with network configured
version: '3'
services:
service2:
image: busybox
command: sleep infinity
networks:
default:
external:
name: external-example
Restarting the services
$ pwd
/tmp/docker-example/compose2
$ docker-compose up -d
Creating compose2_service2_1 ... done
After running docker-compose up -d on both docker-compose.yml files, we see that no new networks were created.
$ docker network ls
NETWORK ID NAME DRIVER SCOPE
25e0c599d5e5 bridge bridge local
2af4d92c2054 external-example bridge local
7df4631e9cff host host local
194d4156d7ab none null local
With the containers using the external-example network, they are able to ping one another.
Test: Service 1 ping Service 2
# By service name
$ docker exec -it compose1_service1_1 ping service2
PING service2 (172.24.0.3): 56 data bytes
64 bytes from 172.24.0.3: seq=0 ttl=64 time=0.054 ms
^C
--- service2 ping statistics ---
1 packets transmitted, 1 packets received, 0% packet loss
round-trip min/avg/max = 0.054/0.054/0.054 ms
# By container name
$ docker exec -it compose1_service1_1 ping compose2_service2_1
PING compose2_service2_1 (172.24.0.2): 56 data bytes
64 bytes from 172.24.0.2: seq=0 ttl=64 time=0.042 ms
^C
--- compose2_service2_1 ping statistics ---
1 packets transmitted, 1 packets received, 0% packet loss
round-trip min/avg/max = 0.042/0.042/0.042 ms
Test: Service 2 ping Service 1
# By service name
$ docker exec -it compose2_service2_1 ping service1
PING service1 (172.24.0.2): 56 data bytes
64 bytes from 172.24.0.2: seq=0 ttl=64 time=0.041 ms
^C
--- service1 ping statistics ---
1 packets transmitted, 1 packets received, 0% packet loss
round-trip min/avg/max = 0.041/0.041/0.041 ms
# By container name
$ docker exec -it compose2_service2_1 ping compose1_service1_1
PING compose1_service1_1 (172.24.0.3): 56 data bytes
64 bytes from 172.24.0.3: seq=0 ttl=64 time=0.042 ms
^C
--- compose1_service1_1 ping statistics ---
1 packets transmitted, 1 packets received, 0% packet loss
round-trip min/avg/max = 0.042/0.042/0.042 ms
As a note, you can configure your services to use a custom container name by declaring the
container_namekey under each service (i.e., at the same level asimage).
Takeaway
You can connect services defined across multiple docker-compose.yml files.
In order to do this you’ll need to:
- Create an external network with
docker network create <network name> - In each of your docker-compose.yml configure the default network to use your externally created network with the
networkstop-level key. - You can use either the service name or container name to connect between containers.
Usefull commands
The most elegant way to remove all non-running containers seems to be:
docker rm $(docker ps -q -f status=exited)
-qprints just the container ids (without column headers)-fallows you to filter your list of printed containers (in this case we are filtering to only show exited containers)
Interesting Articles
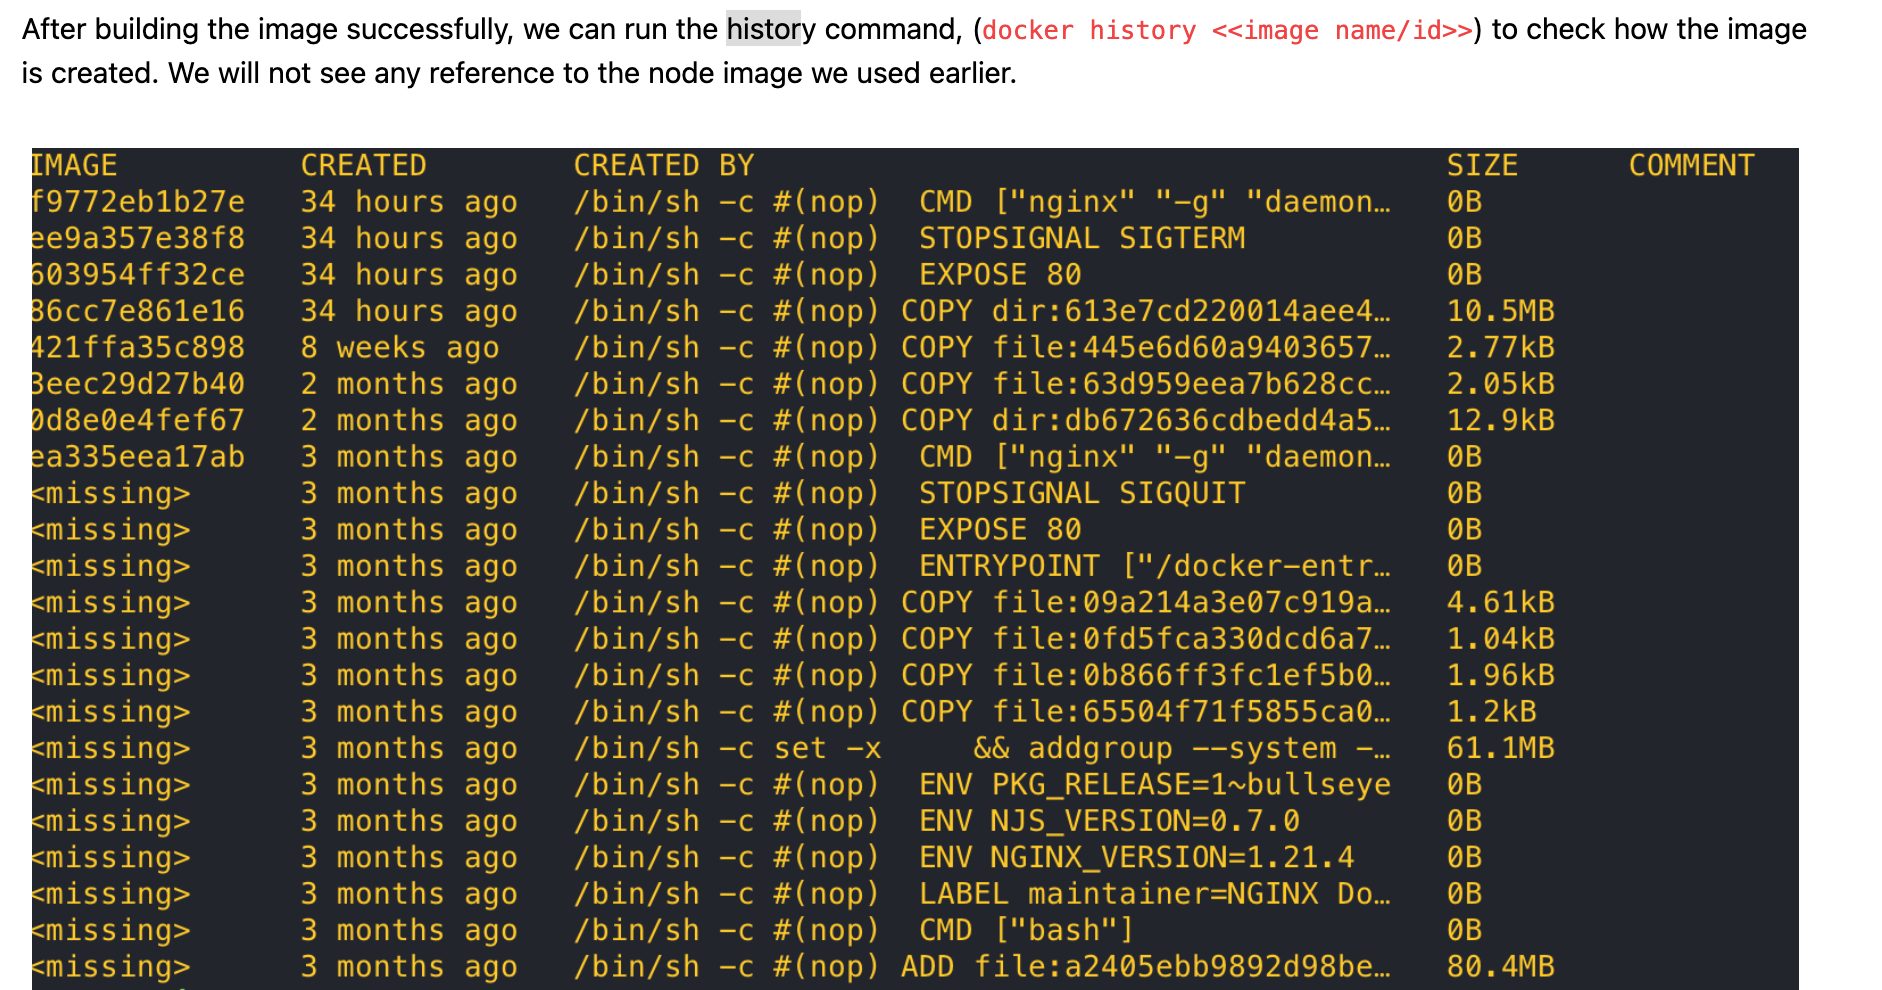
Docker Best Practices: Choosing Between RUN, CMD, and ENTRYPOINT
https://www.docker.com/blog/docker-best-practices-choosing-between-run-cmd-and-entrypoint/
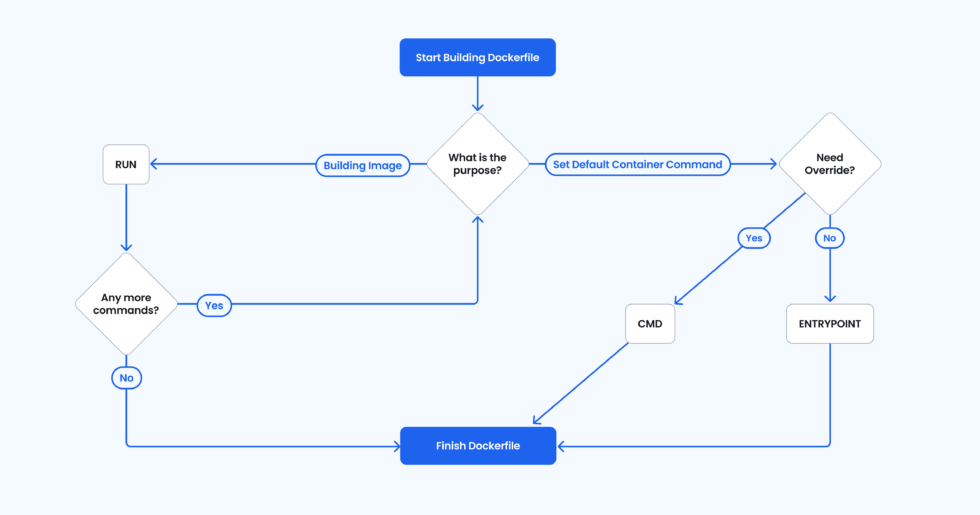 Figure 1: Decision tree — RUN, CMD, ENTRYPOINT.
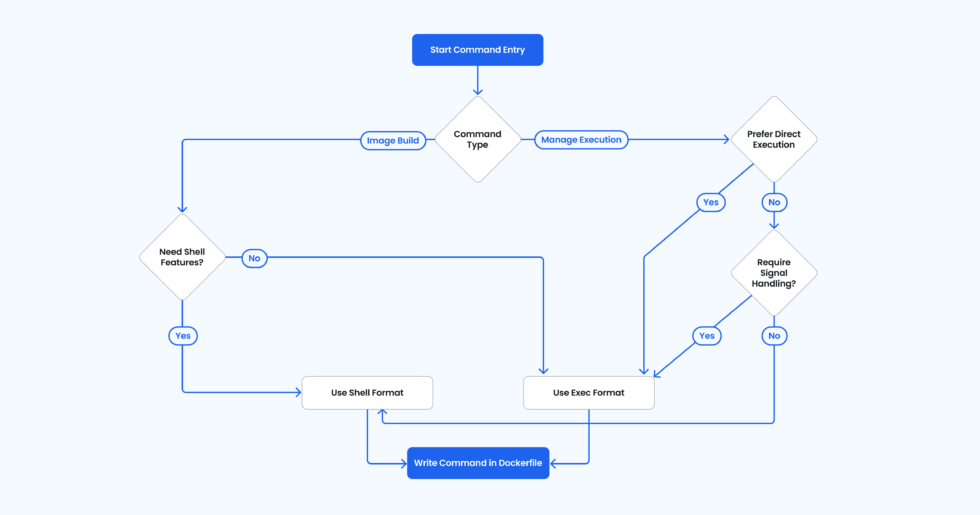
Figure 2: Decision tree — exec vs. shell form.
Docker SPA
https://skamalakannan.dev/posts/dockerizing-your-spa/
Setting up Docker in Docker (dind/socket) with GitLab Runners
https://blog.hiebl.cc/posts/gitlab-runner-docker-in-docker/#dind-vs-socket-passthrough
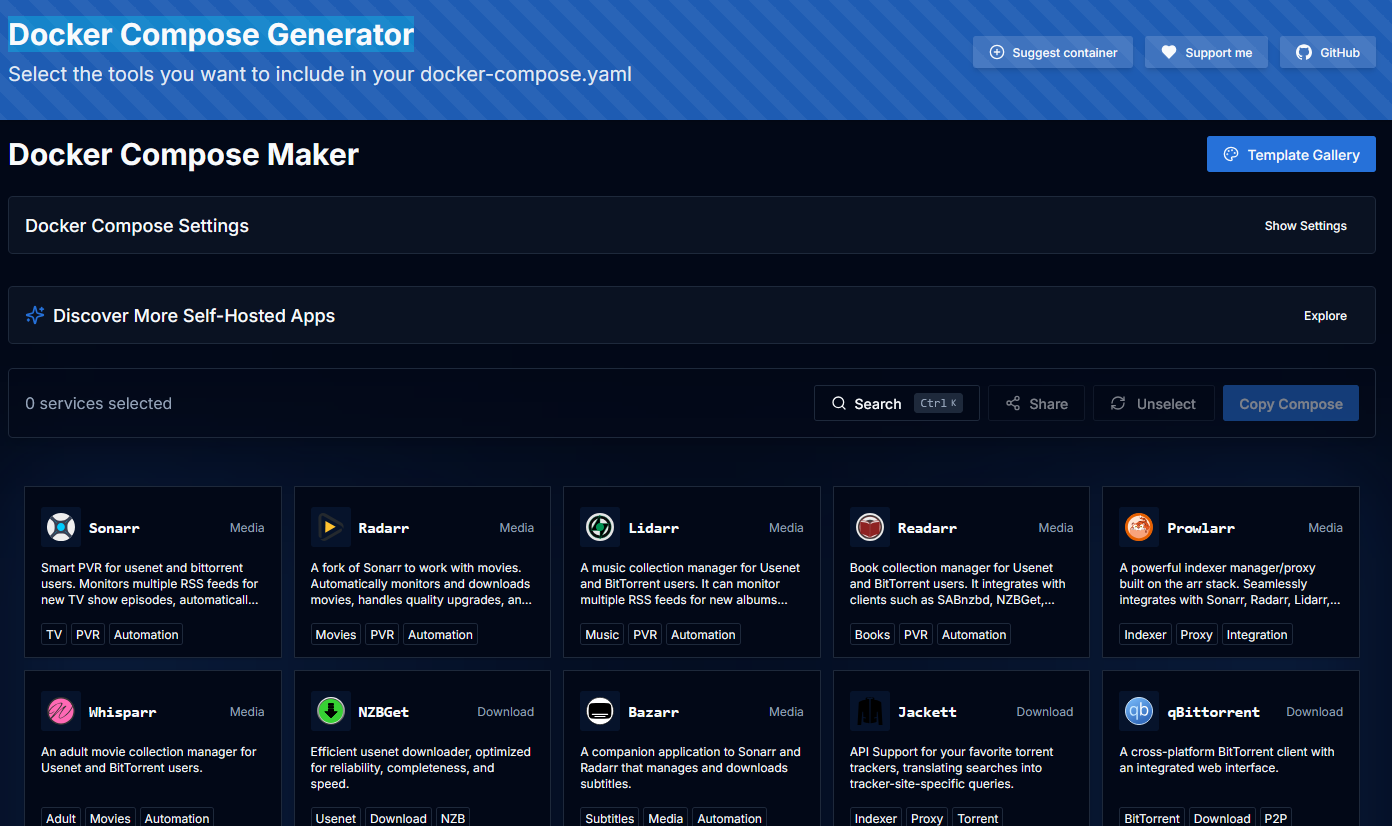
Docker Compose Generator
Python
Nginx uWSGI Flask Python2
Flask + Virtual Env
Python 2.7 Virtual Env
pip2 install virtualenvcd /home/user/web/domain
virtualenv --python=$(which python2) ./private/
source private/bin/activate
pip install -r ../public_html/requirements.txtuWSGI Emperor
pip2 install wheel uwsgicat /etc/systemd/system/uwsgi.service
[Unit]
Description=uWSGI Emperor service
After=syslog.target
[Service]
ExecStart=/usr/local/bin/uwsgi --emperor /etc/uwsgi/sites
Restart=always
KillSignal=SIGQUIT
Type=notify
StandardError=syslog
NotifyAccess=all
[Install]
WantedBy=multi-user.targetsystemctl daemon-reload
systemctl start uwsgi.service
systemctl status uwsgi.service
systemctl enable uwsgi.serviceApplication configuration file
cat web.domain.site.ini
[uwsgi]
uid=appuser
gid=www-data
socket=127.0.0.1:13000
procname-prefix-spaced = web.domain.site
# Enable uWSGI stats server
# stats = :13034
# stats-http = true
# the virtualenv (full path)
virtualenv=/home/appuser/web/web.domain.site/private
# Project path
chdir=/home/appuser/web/web.domain.site/public_html
# Django's wsgi file (path starting from chdir/)
wsgi-file=run.wsgi
# Log paths
logto=/var/log/nginx/domains/web.domain.site.uwsgi.log
log-date = [%%Y:%%m:%%d %%H:%%M:%%S]
logformat-strftime
log-format = [%(ftime)]
logfile-chown = www-data:appuser
logfile-chmod = 640
# Do not log some errors caused by client disconnects
ignore-sigpipe = true
ignore-write-errors = true
disable-write-exception = true
master=true
enable-threads=true
processes=2
threads=5
single-interpreter=true
thunder-lock=true
die-on-term=true
max-requests=1000
buffer-size=32768
post-buffering=8192
# clear environment on exit
vacuum=trueNginx Virtualhost
https://uwsgi-docs.readthedocs.io/en/latest/Nginx.html
location / {
include uwsgi_params;
uwsgi_pass uwsgi://localhost:13000;
}Ref: https://uwsgi-docs.readthedocs.io/en/latest/Systemd.html
Python3 VENV
apt update && apt install -y python3.12-venv
python3 -m venv sectigo
source sectigo/bin/activate
deactivate
Download Broadcom VMWare Hypervisors
Login Required
- https://support.broadcom.com/group/ecx/free-downloads
- https://support.broadcom.com/group/ecx/productdownloads?subfamily=VMware%20Workstation%20Pro&freeDownloads=true
- https://support.broadcom.com/group/ecx/productdownloads?subfamily=VMware%20Fusion&freeDownloads=true
ESXi 8 Minimum Storage
Shift + O on boot
Append
cpuUniformityHardCheckPanic=FALSE systemMediaSize=min
Permanent apply
esxcli system settings kernel set -s cpuUniformityHardCheckPanic -v FALSE
esxcli system settings kernel set -s ignoreMsrFaults -v TRUERef:
https://knowledge.broadcom.com/external/article/395554/esxi-psod-with-fatal-cpu-mismatch-on-fea.html
https://knowledge.broadcom.com/external/article/345195/boot-option-to-configure-the-size-of-esx.html
- min 33GB, for single disk or embedded servers
- small 69GB, for servers with at least 512GB RAM
- max all available space, for multi-terabyte servers
ZLib
http://bookszlibb74ugqojhzhg2a63w5i2atv5bqarulgczawnbmsb6s6qead.onion/
LINUX for Today
Running out of inodes
# Check Inode
df -i
du --inode -d 1 | sort -n | head -10Extend Ubuntu Disk
sudo parted -s -a opt /dev/sda "resizepart 3 100%"
sudo lvextend -l +100%FREE /dev/ubuntu-vg/ubuntu-lv
sudo resize2fs -p /dev/mapper/ubuntu--vg-ubuntu--lvExtend single disk
growpart /dev/sda 2
resize2fs /dev/sda2
growpart /dev/sdb 1
resize2fs /dev/sdb1https://netshopisp.medium.com/how-to-extend-lvm-disk-on-linux-ubuntu-20-04-35b1c2d5d5e9
Logical Volume Manager - LVM
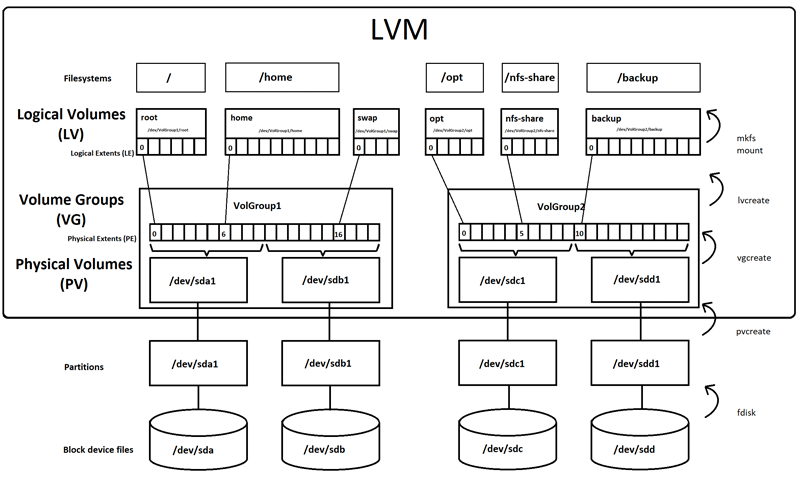
https://packetpushers.net/blog/ubuntu-extend-your-default-lvm-space/
Resize LVM, Ubuntu https://rdr-it.com/en/ubuntu-extend-lvm-partition-and-disk/
Ubuntu – Extend LVM partition and disk
https://rdr-it.io/en/ubuntu-extend-lvm-partition-and-disk/
rm -rf root permissions denied
A number of things could be wrong here. From my own experience, I recommend checking the directory attributes with the lsattr utility. Often times I set the immutable bit on files to prevent accidental modification, and to slightly slow down any malicious person from messing with it. If the flag is indeed set, simply remove it: chattr -R -i /var/www
https://unix.stackexchange.com/questions/529579/rm-rf-root-permissions-denied
Wireguard
https://www.ivpn.net/knowledgebase/linux/linux-autostart-wireguard-in-systemd/
Nginx Tunning
Nginx GeoIP
https://mailfud.org/geoip-legacy/
Install Nginx Module
apt install nginx-module-geoip
The GeoIP dynamic modules for nginx have been installed.
To enable these modules, add the following to /etc/nginx/nginx.conf
and reload nginx:
load_module modules/ngx_http_geoip_module.so;
load_module modules/ngx_stream_geoip_module.so;
http {
geoip_country /usr/share/GeoIP/GeoIP.dat;
geoip_city /usr/share/GeoIP/GeoIPCity.dat;
}
VHOST{
add_header X-GeoIP "$geoip_country_code";
}NGINX Tuning For Best Performance
https://gist.github.com/denji/8359866
User RDP SSH
useradd -m -s /bin/bash user
usermod -aG sudo user
passwd user
su user
echo "xfce4-session" | tee .xsession
sudo systemctl restart xrdpAllow specific user login ssh without password/key
$ useradd ukztuxyysvotlekjk -m -s /bin/bash
add /etc/ssh/sshd_config
Match User ukztuxyysvotlekjk
PermitEmptyPasswords yes
PasswordAuthentication yes
Emty password
$ sudo passwd -d ukztuxyysvotlekjkVestaCP/HestiaCP Commands
https://forum.vestacp.com/viewtopic.php?t=10893#p41235
Obtain the list of system domains
v-list-users | tail -n +3 | awk '{print "v-list-web-domains "$1" | tail -n +3"}' | bash
v-list-users | tail -n +3 | awk '{print "v-list-web-domains "$1" | tail -n +3"}' | bash | awk '{ print $1}'
Register New Gitlab Runner (Docker-in-Docker)
Register New Runner
docker run --rm -it -v /opt/GitlabRunner/config:/etc/gitlab-runner gitlab/gitlab-runner register --url https://gitlab.com --token TOKENcompose.yml
services:
gitlab-runner-container:
image: gitlab/gitlab-runner:latest
container_name: gitlab-runner-container
restart: always
volumes:
- ./config/:/etc/gitlab-runner/
- /var/run/docker.sock:/var/run/docker.sockMinIO Client Operation
mc admin user add alias user TOKEN
mc admin policy create alias key-upload-only key-upload-only.json
mc admin policy attach alias key-upload-only --user user
mc alias set key-user https://s3.alias.space user TOKEN
mc cp FILE key-user/key/
Hardware
Alfa Wifi AWUS036AXML
USB Adapter AWUS036AXML
https://zsecurity.org/product/alfa-awus036ach-2-4-5-ghz-usb-wireless-adapter/
Key Features
Applications
Specifications
Brand: Alfa.
Model: AWUS036ACH.
Chipset: Realtek RTL8812AU.
Standards: IEEE 802.11 a/b/g/n/ac.
Data Rate:
802.11b: UP to 11Mbps.
802.11g: UP to 54Mbps.
802.11a: UP to 54Mbps.
802.11n: UP to 150Mbps.
802.11ac: UP to 867Mbps.
OS Supported: Kali Linux (whether it is installed as a virtual machine or a main OS).
Antenna: 2 x 5dBi 2.4GHz Antenna.
Frequency Range: 2.4 & 5 GHz.
Security: WEP 64/128, 802.1X support, Wi-Fi Protected Access (WPA/WPA2), WPA-PSK, WPA II-PSK.
Driver:
https://files.alfa.com.tw/?dir=%5B1%5D%20WiFi%20USB%20adapter/AWUS036AXML


Xiaomi 13T
Firm: https://mifirm.net/model/aristotle.ttt#
Bloodhound Linux/Docker Quickstart
https://bloodhound.specterops.io/get-started/quickstart/community-edition-quickstart
wget https://github.com/SpecterOps/bloodhound-cli/releases/latest/download/bloodhound-cli-linux-amd64.tar.gz
tar -xvzf bloodhound-cli-linux-amd64.tar.gz
./bloodhound-cli install
Clone ESXi VMs
[root@esxi1:/opt/scripts] ./clonevm.sh master node3 datastore2
Checking source VM power state...
Creating destination directory: /vmfs/volumes/datastore2/node3
Cloning and converting the virtual disk...
Destination disk format: VMFS zeroedthick
Cloning disk '/vmfs/volumes/datastore2/master/master.vmdk'...
Clone: 100% done.
Copying and updating the VMX configuration...
Registering the new VM in the ESXi inventory...
🎉 Clone completed! The new VM is registered with ID: 261
Please power on the new VM and select 'I Copied it' if prompted.
USB Drive Read-Only Setup Guide
Run file USB_Write_Protector.bat as Administrator
======================================================
USB READ-ONLY MANAGER (DISKPART)
======================================================
Microsoft DiskPart version 10.0.26100.1150
Copyright (C) Microsoft Corporation.
On computer: ADS-PENTAHO
DISKPART>
Disk ### Status Size Free Dyn Gpt
-------- ------------- ------- ------- --- ---
Disk 0 Online 476 GB 1024 KB *
Disk 1 Online 119 GB 0 B
DISKPART>
[1] Lock USB (Set Read-Only)
[2] Unlock USB (Make Writable)
[3] Check Current Status (Default)
[4] Exit
Choose an option (1-4) [Default: 3]: 1
Enter the DISK NUMBER: 1
Executing command set readonly for Disk 1...
Microsoft DiskPart version 10.0.26100.1150
Copyright (C) Microsoft Corporation.
On computer: ADS-PENTAHO
Disk 1 is now the selected disk.
Disk attributes set successfully.
SanDisk Extreme Pro USB Device
Disk ID: 00000000
Type : USB
Status : Online
Path : 0
Target : 0
LUN ID : 0
Location Path : UNAVAILABLE
Current Read-only State : Yes
Read-only : Yes
Boot Disk : No
Pagefile Disk : No
Hibernation File Disk : No
Crashdump Disk : No
Clustered Disk : No
Volume ### Ltr Label Fs Type Size Status Info
---------- --- ----------- ----- ---------- ------- --------- --------
Volume 3 D SupMentos NTFS Removable 119 GB Healthy
======================================================
Command completed.
======================================================
Press any key to continue . . .Programming Notes for Professionals books

Top 25 Penetration Testing Skills and Competencies (Detailed)
https://www.infosecmatter.com/top-25-penetration-testing-skills-and-competencies-detailed/
https://archive.sectigo.space/archive/1771996935.843272/index.html
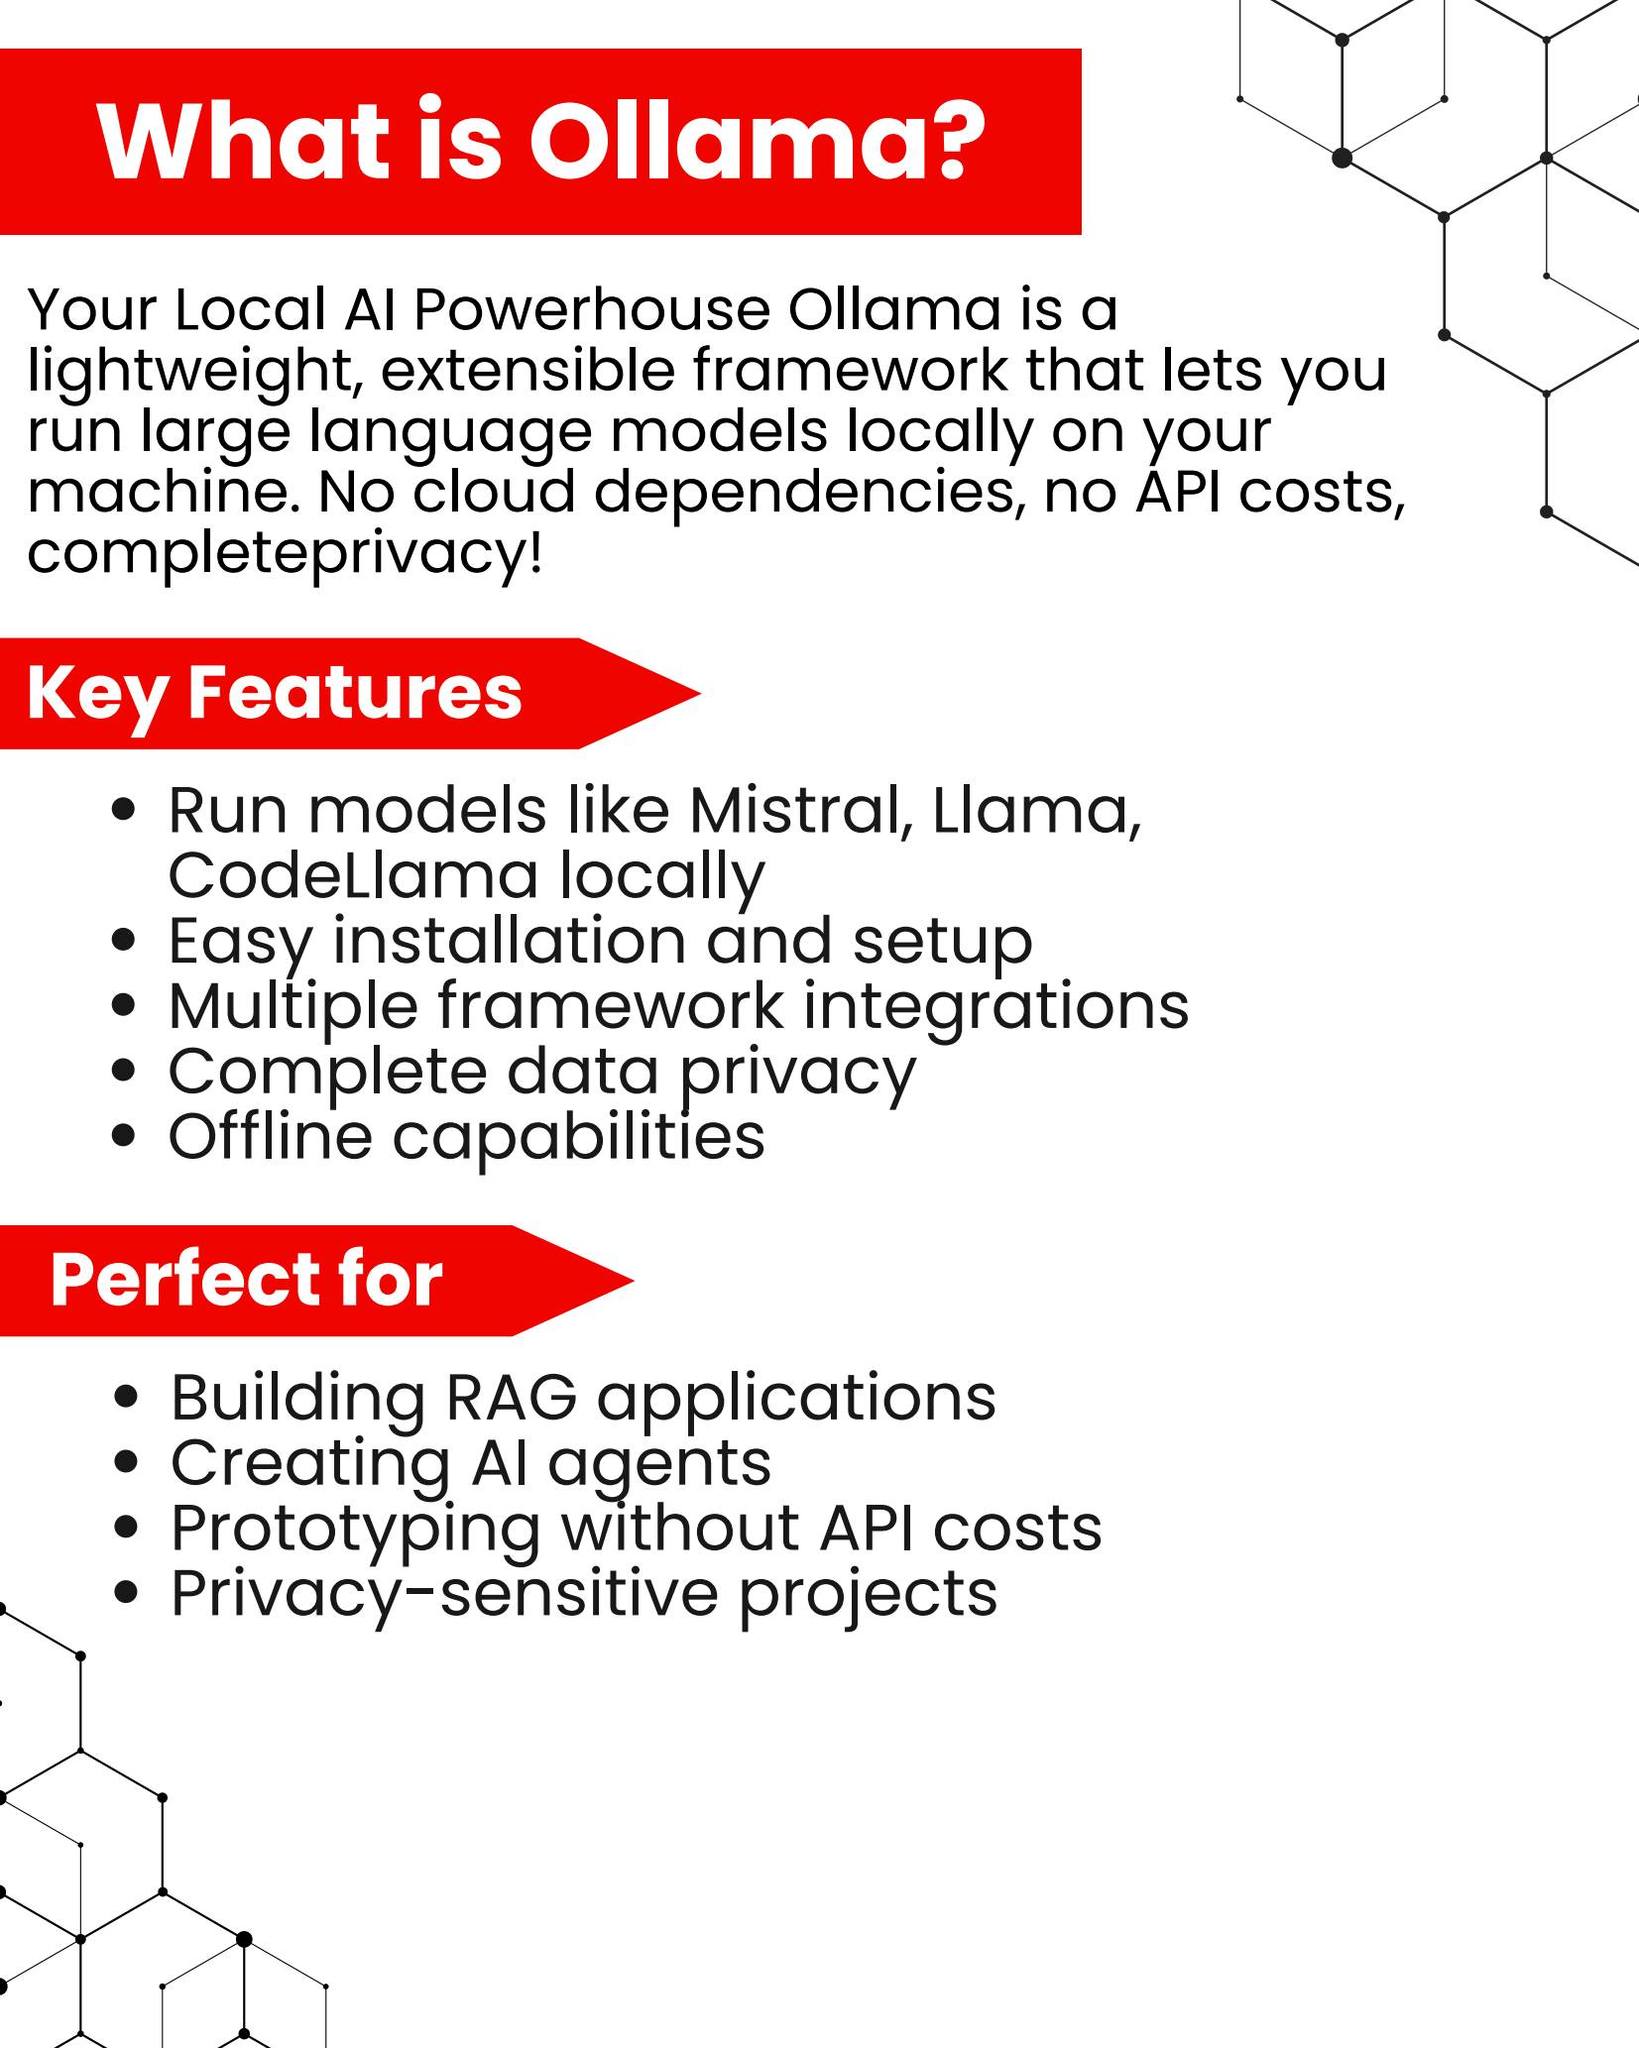
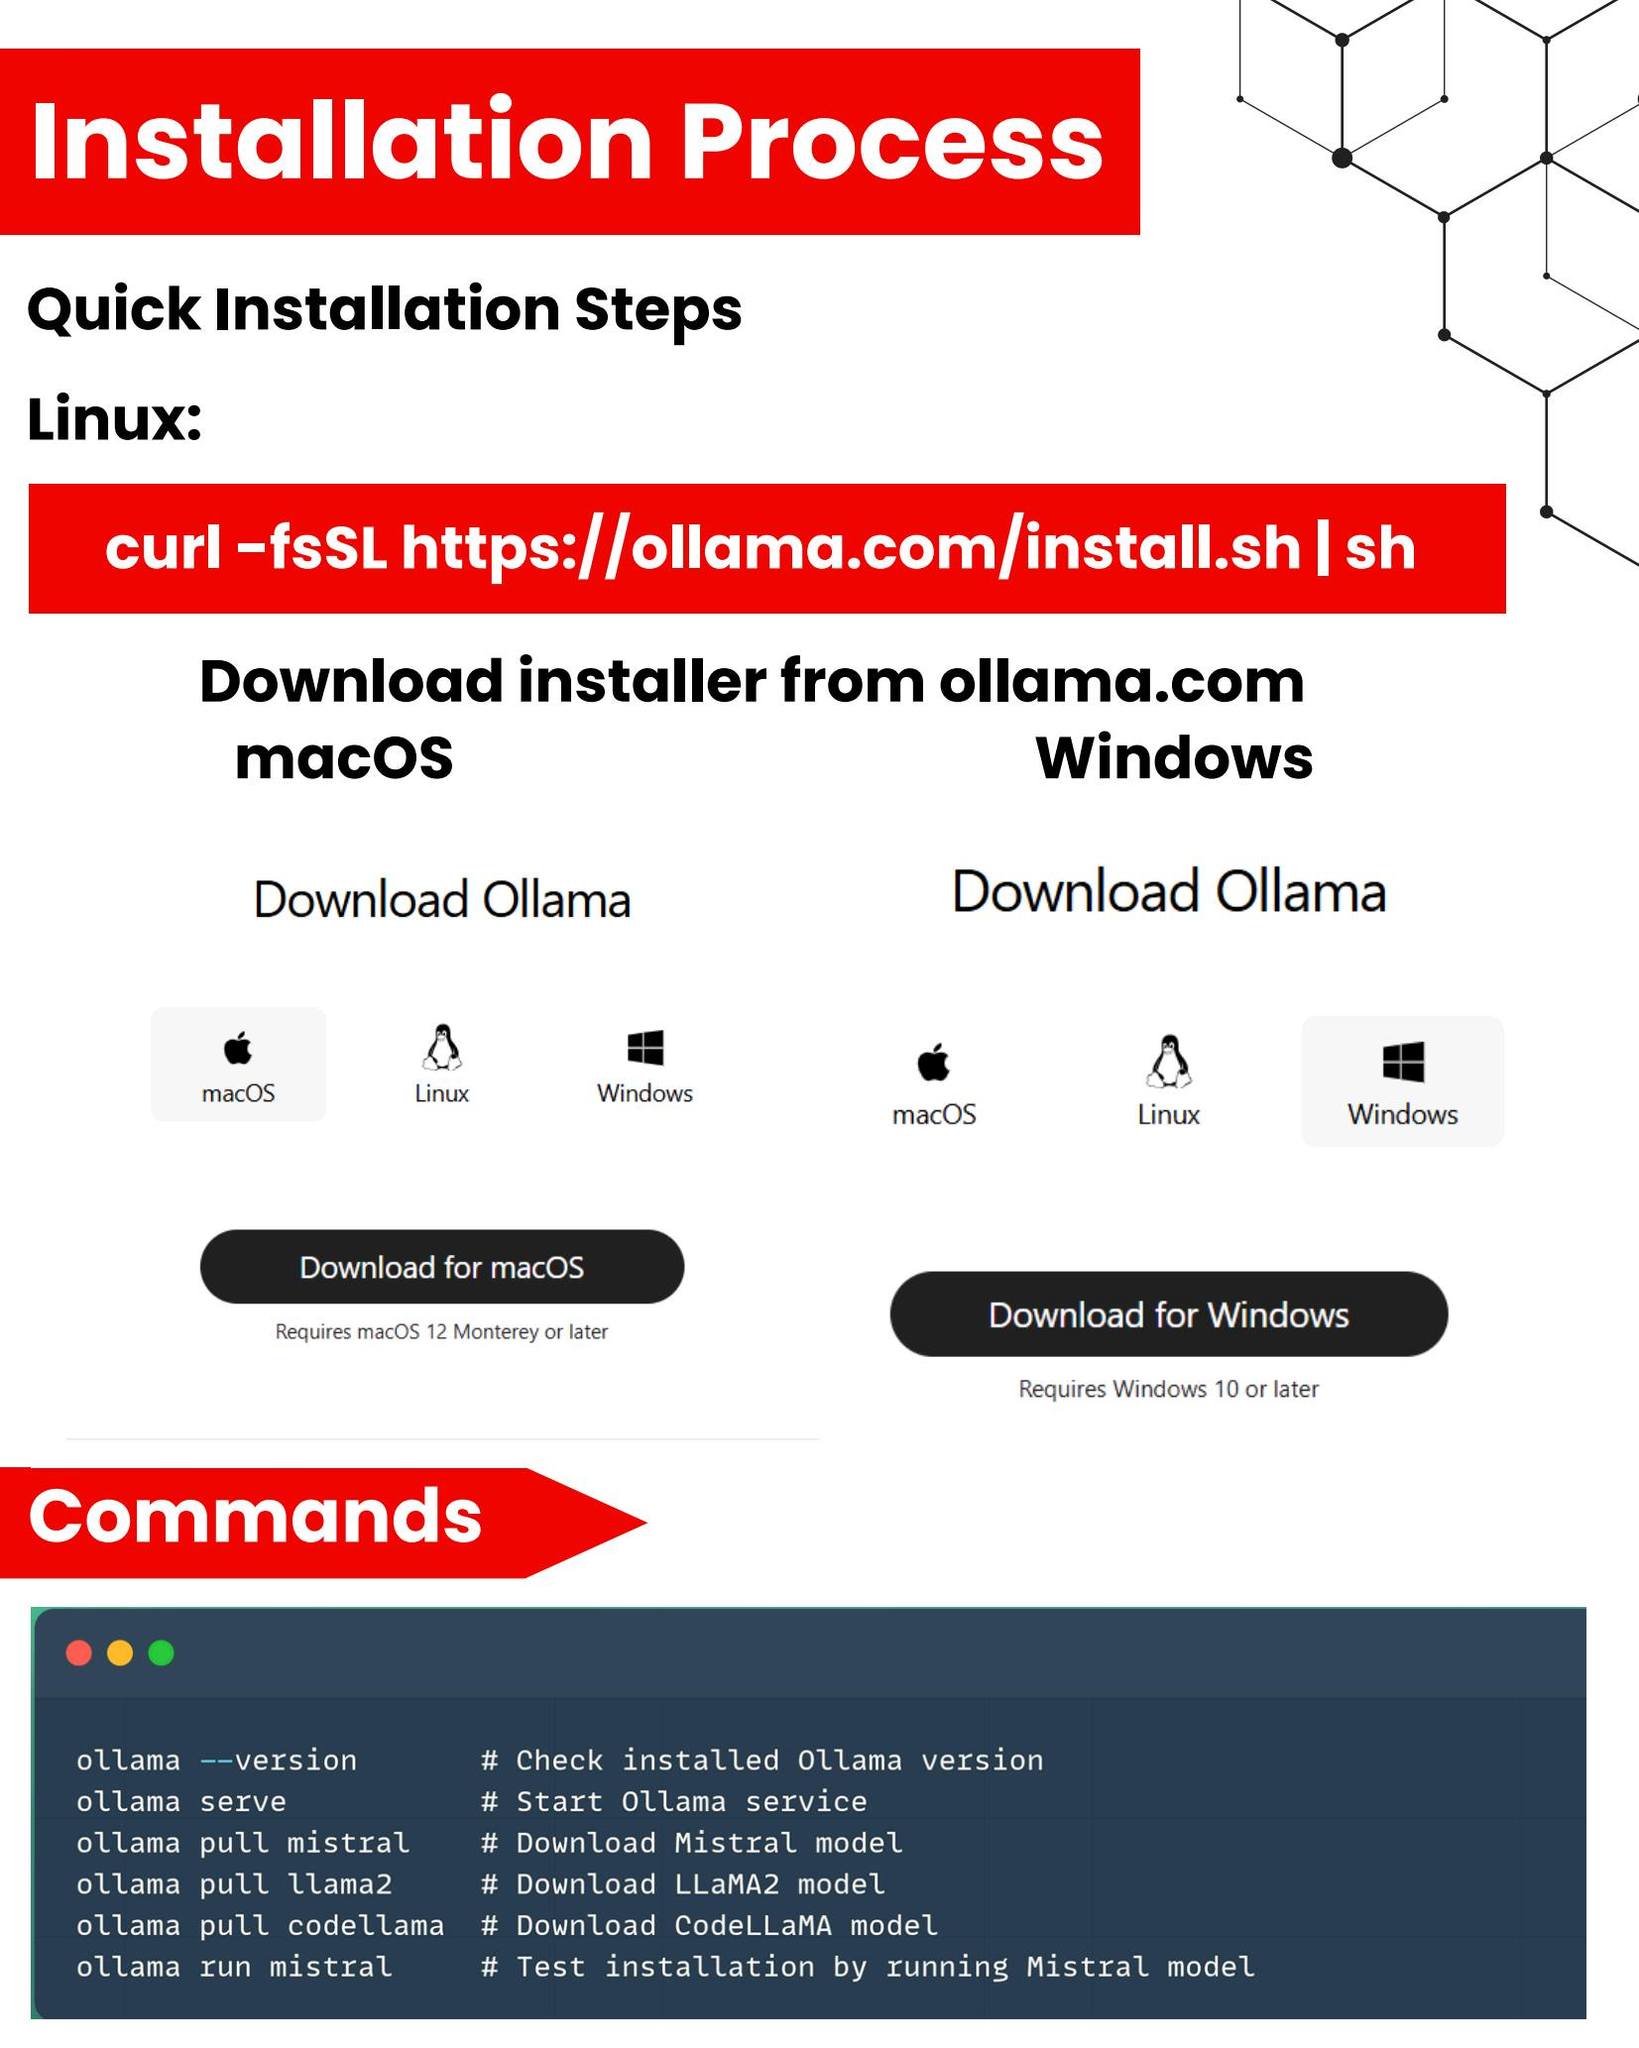
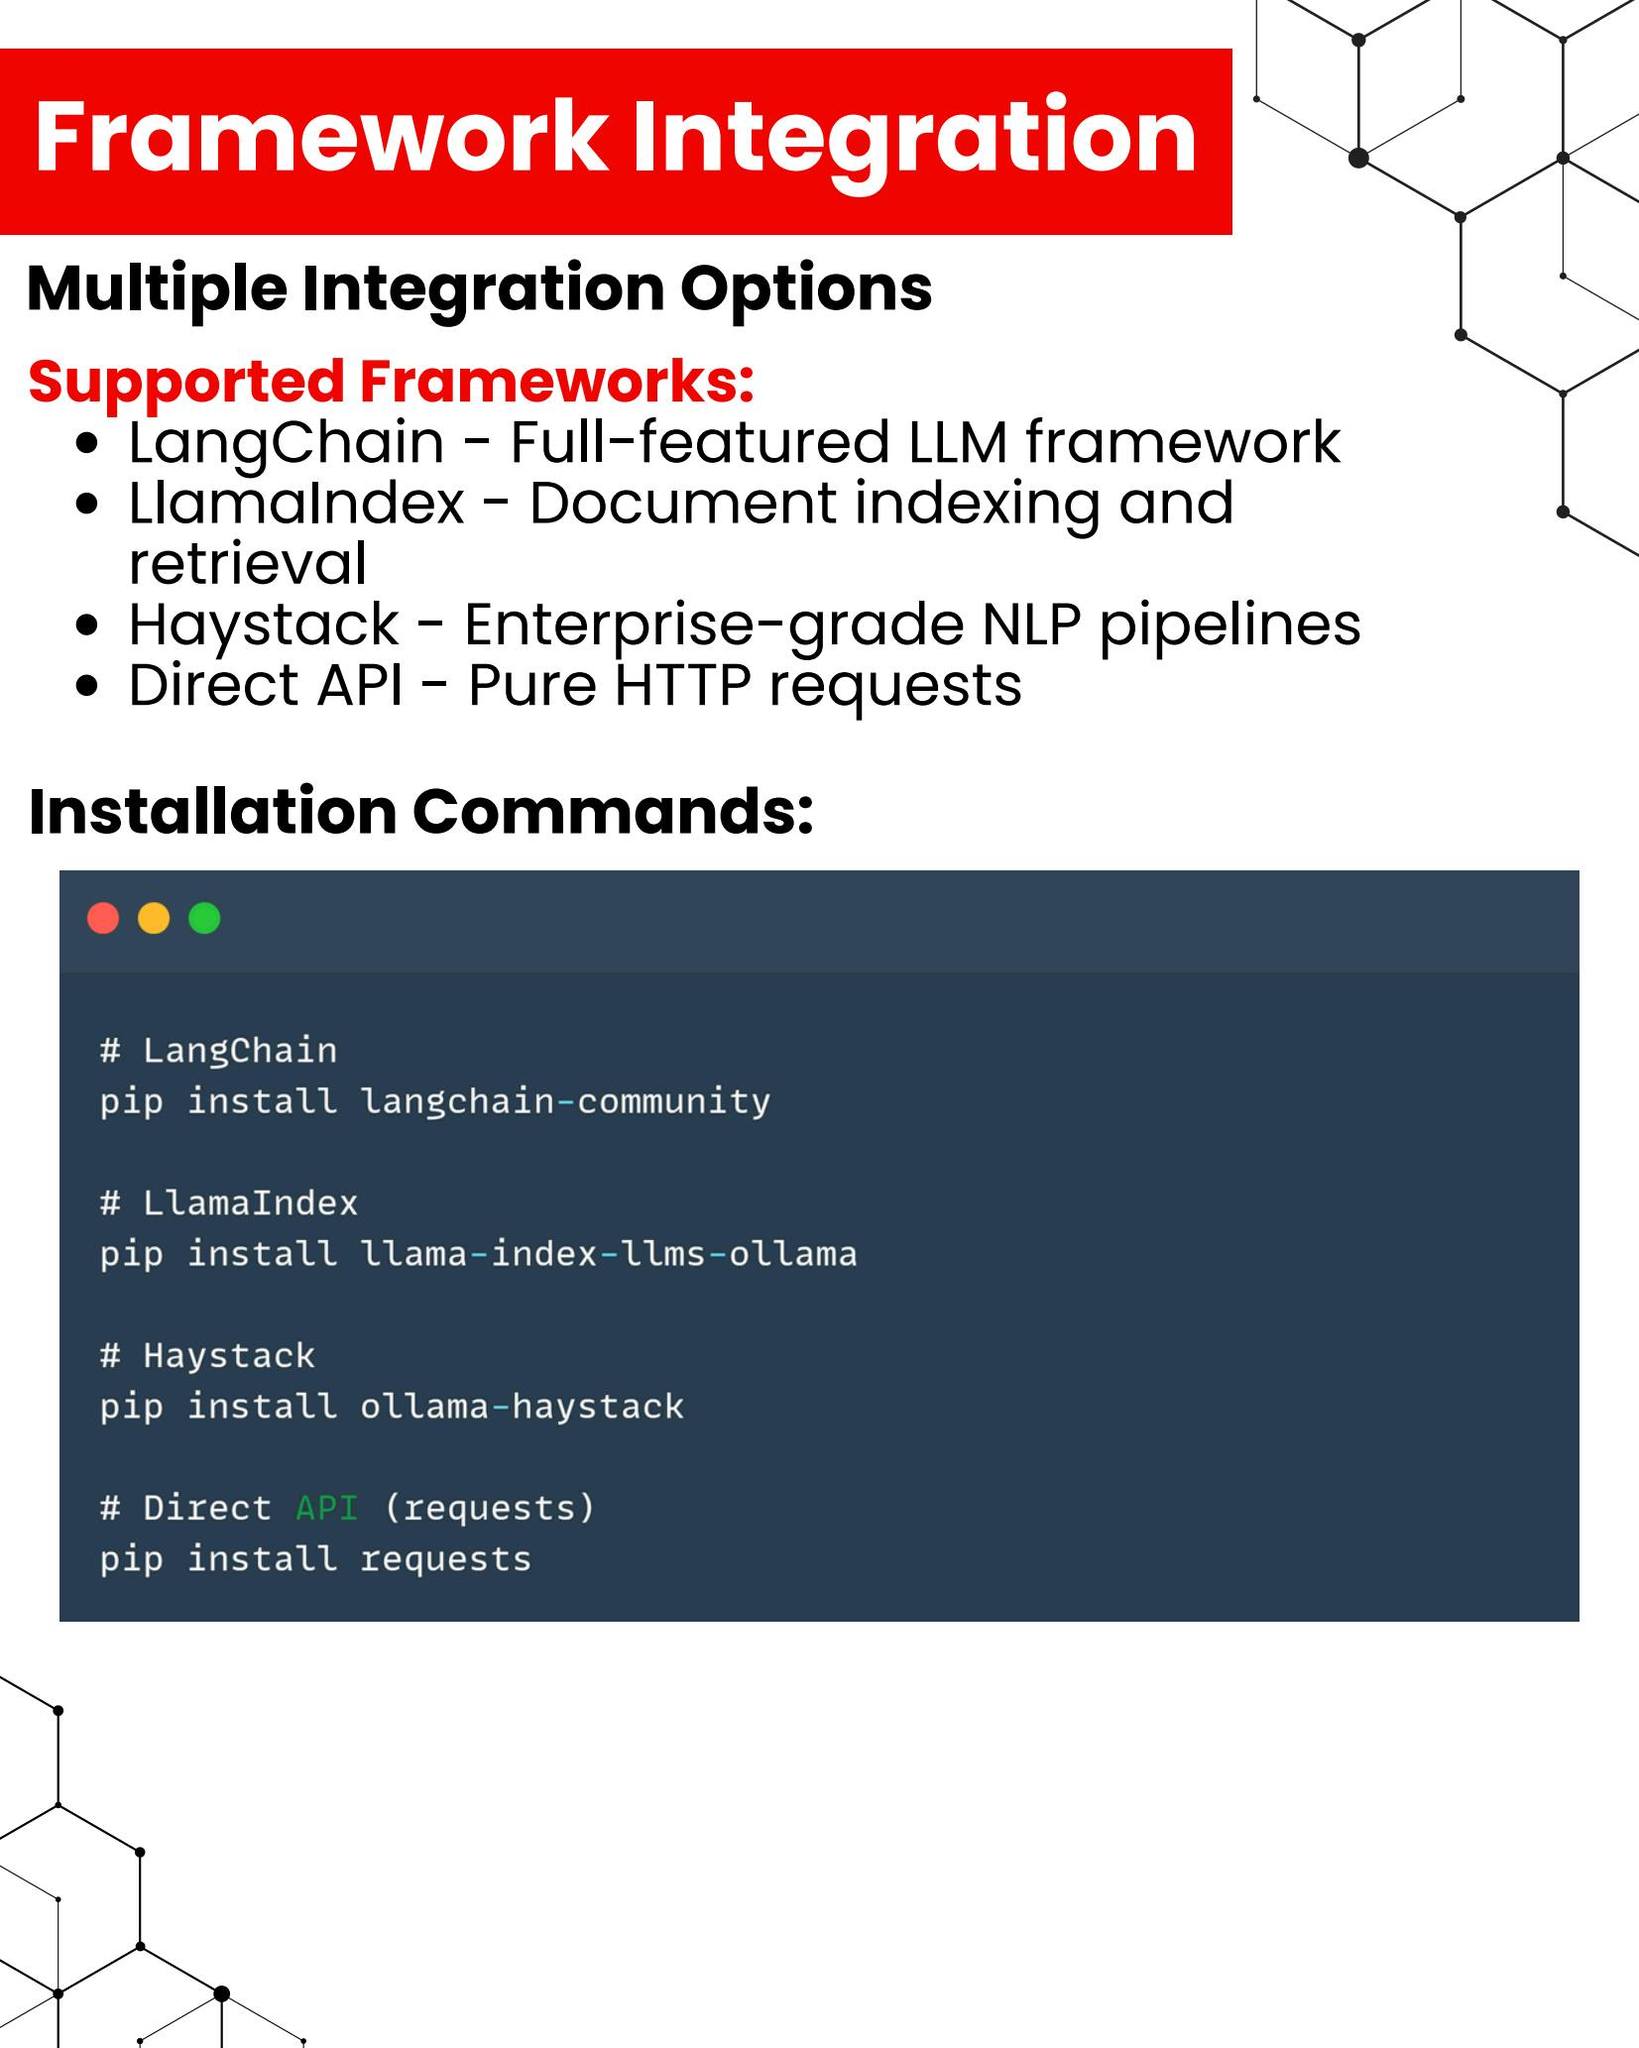
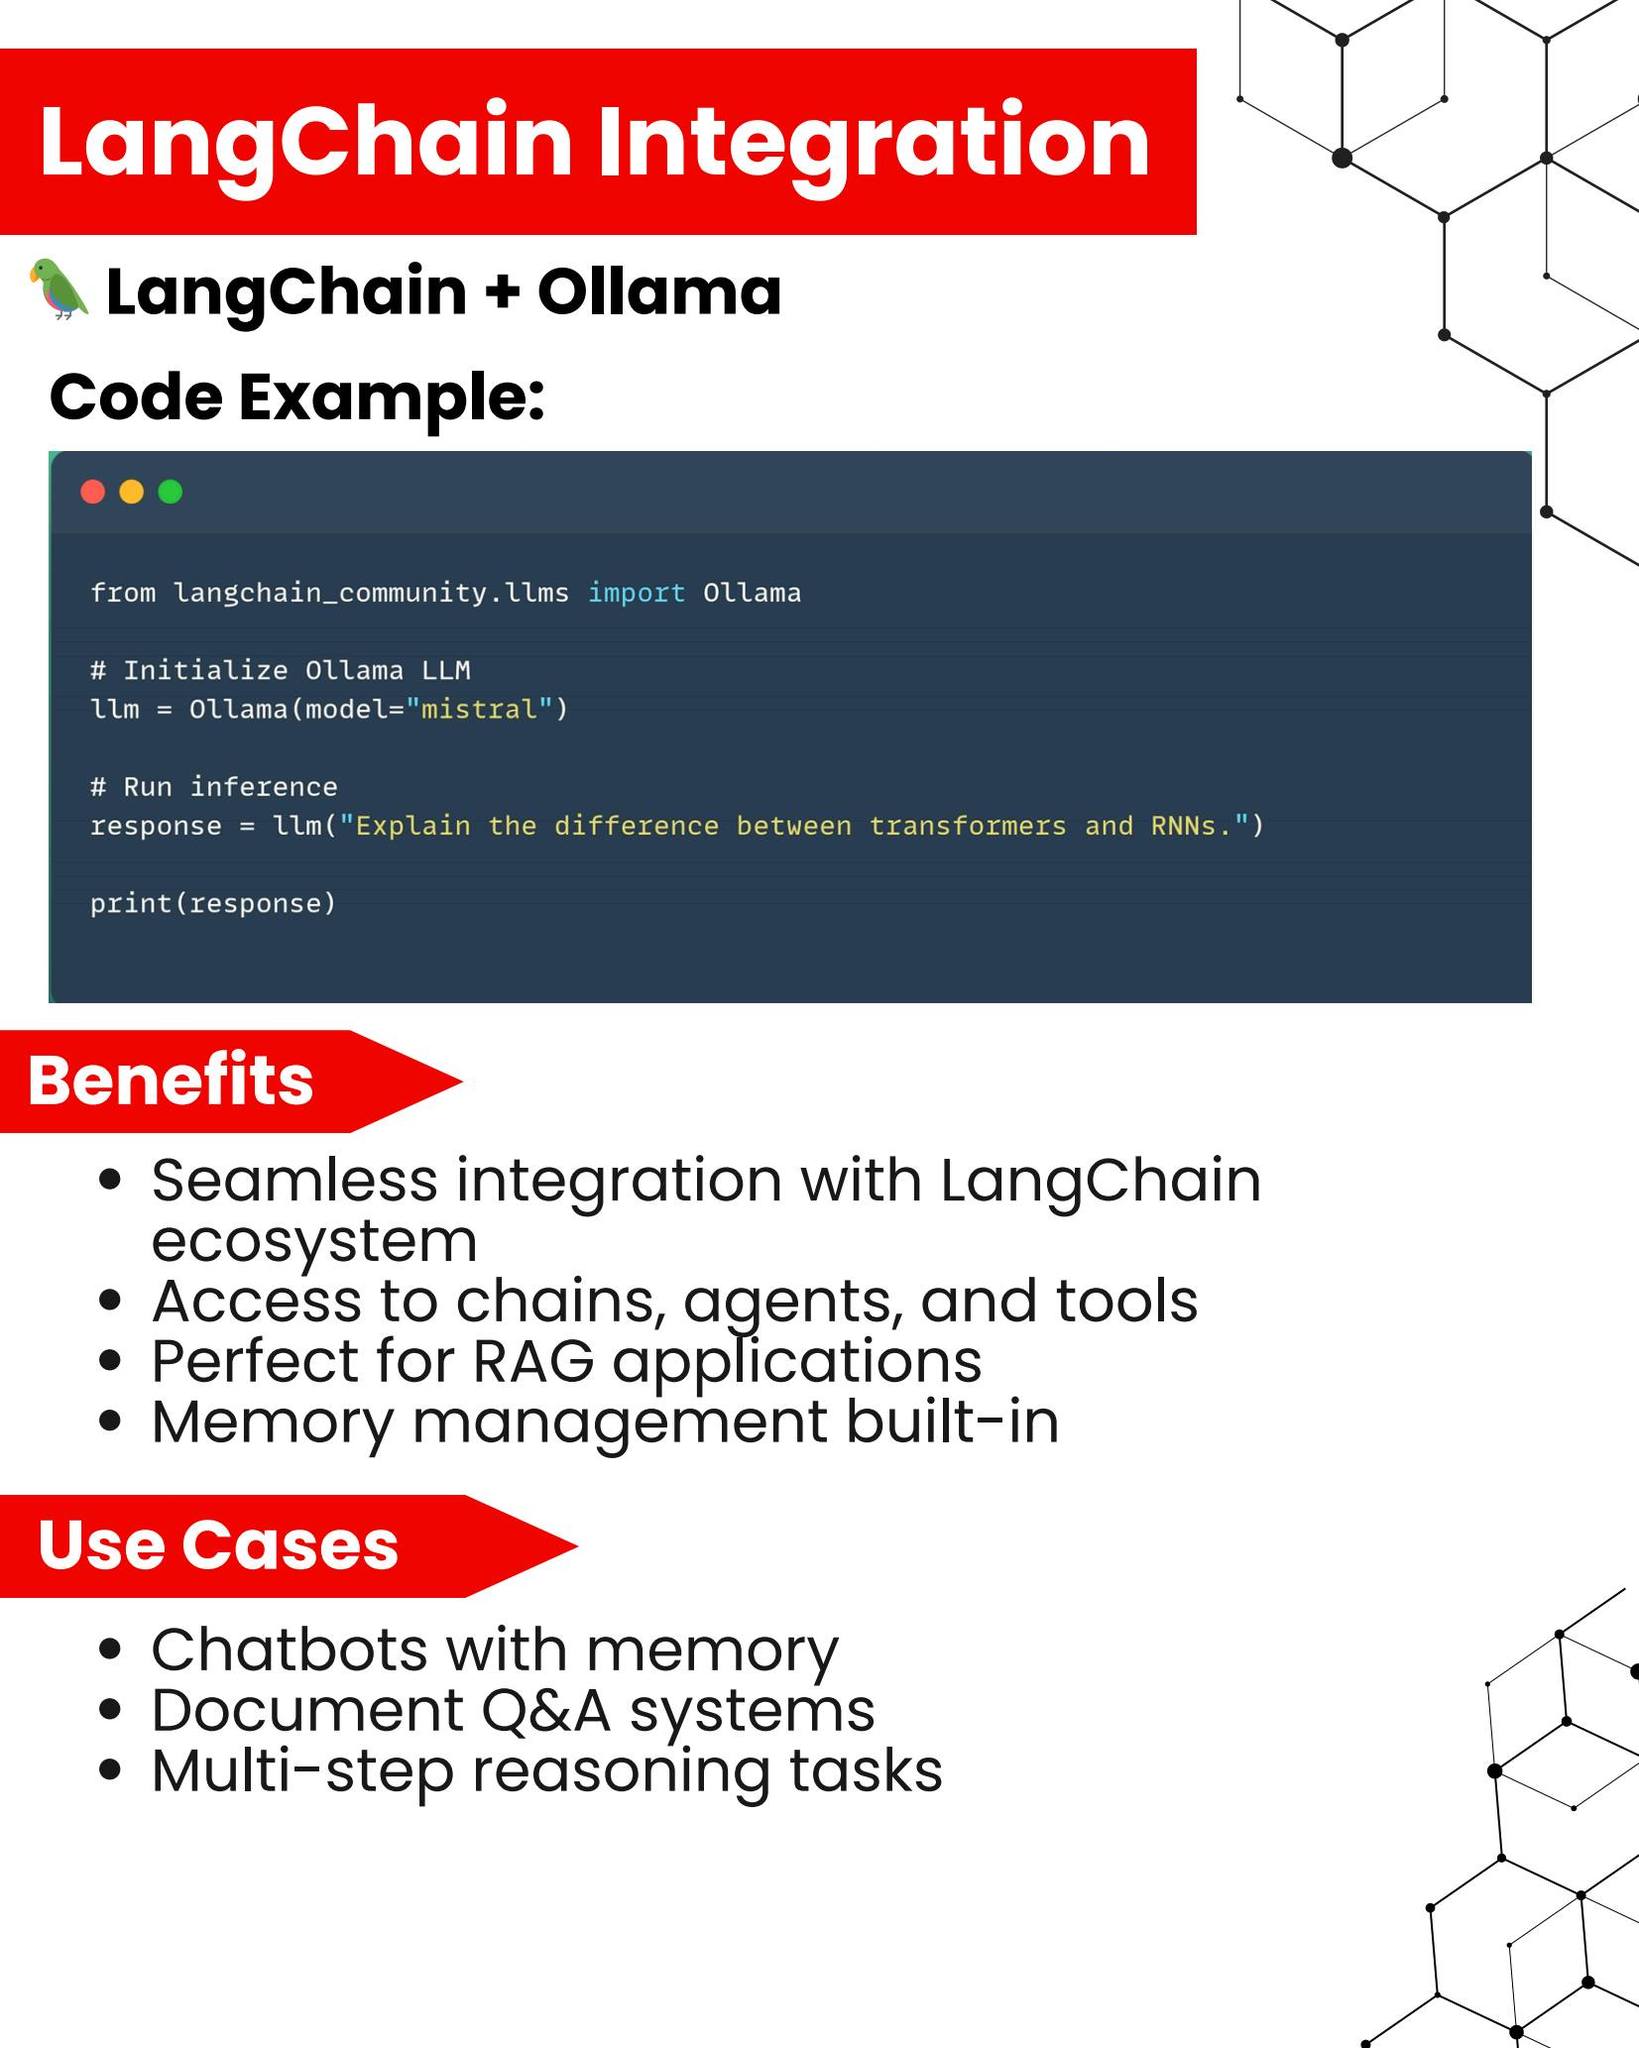
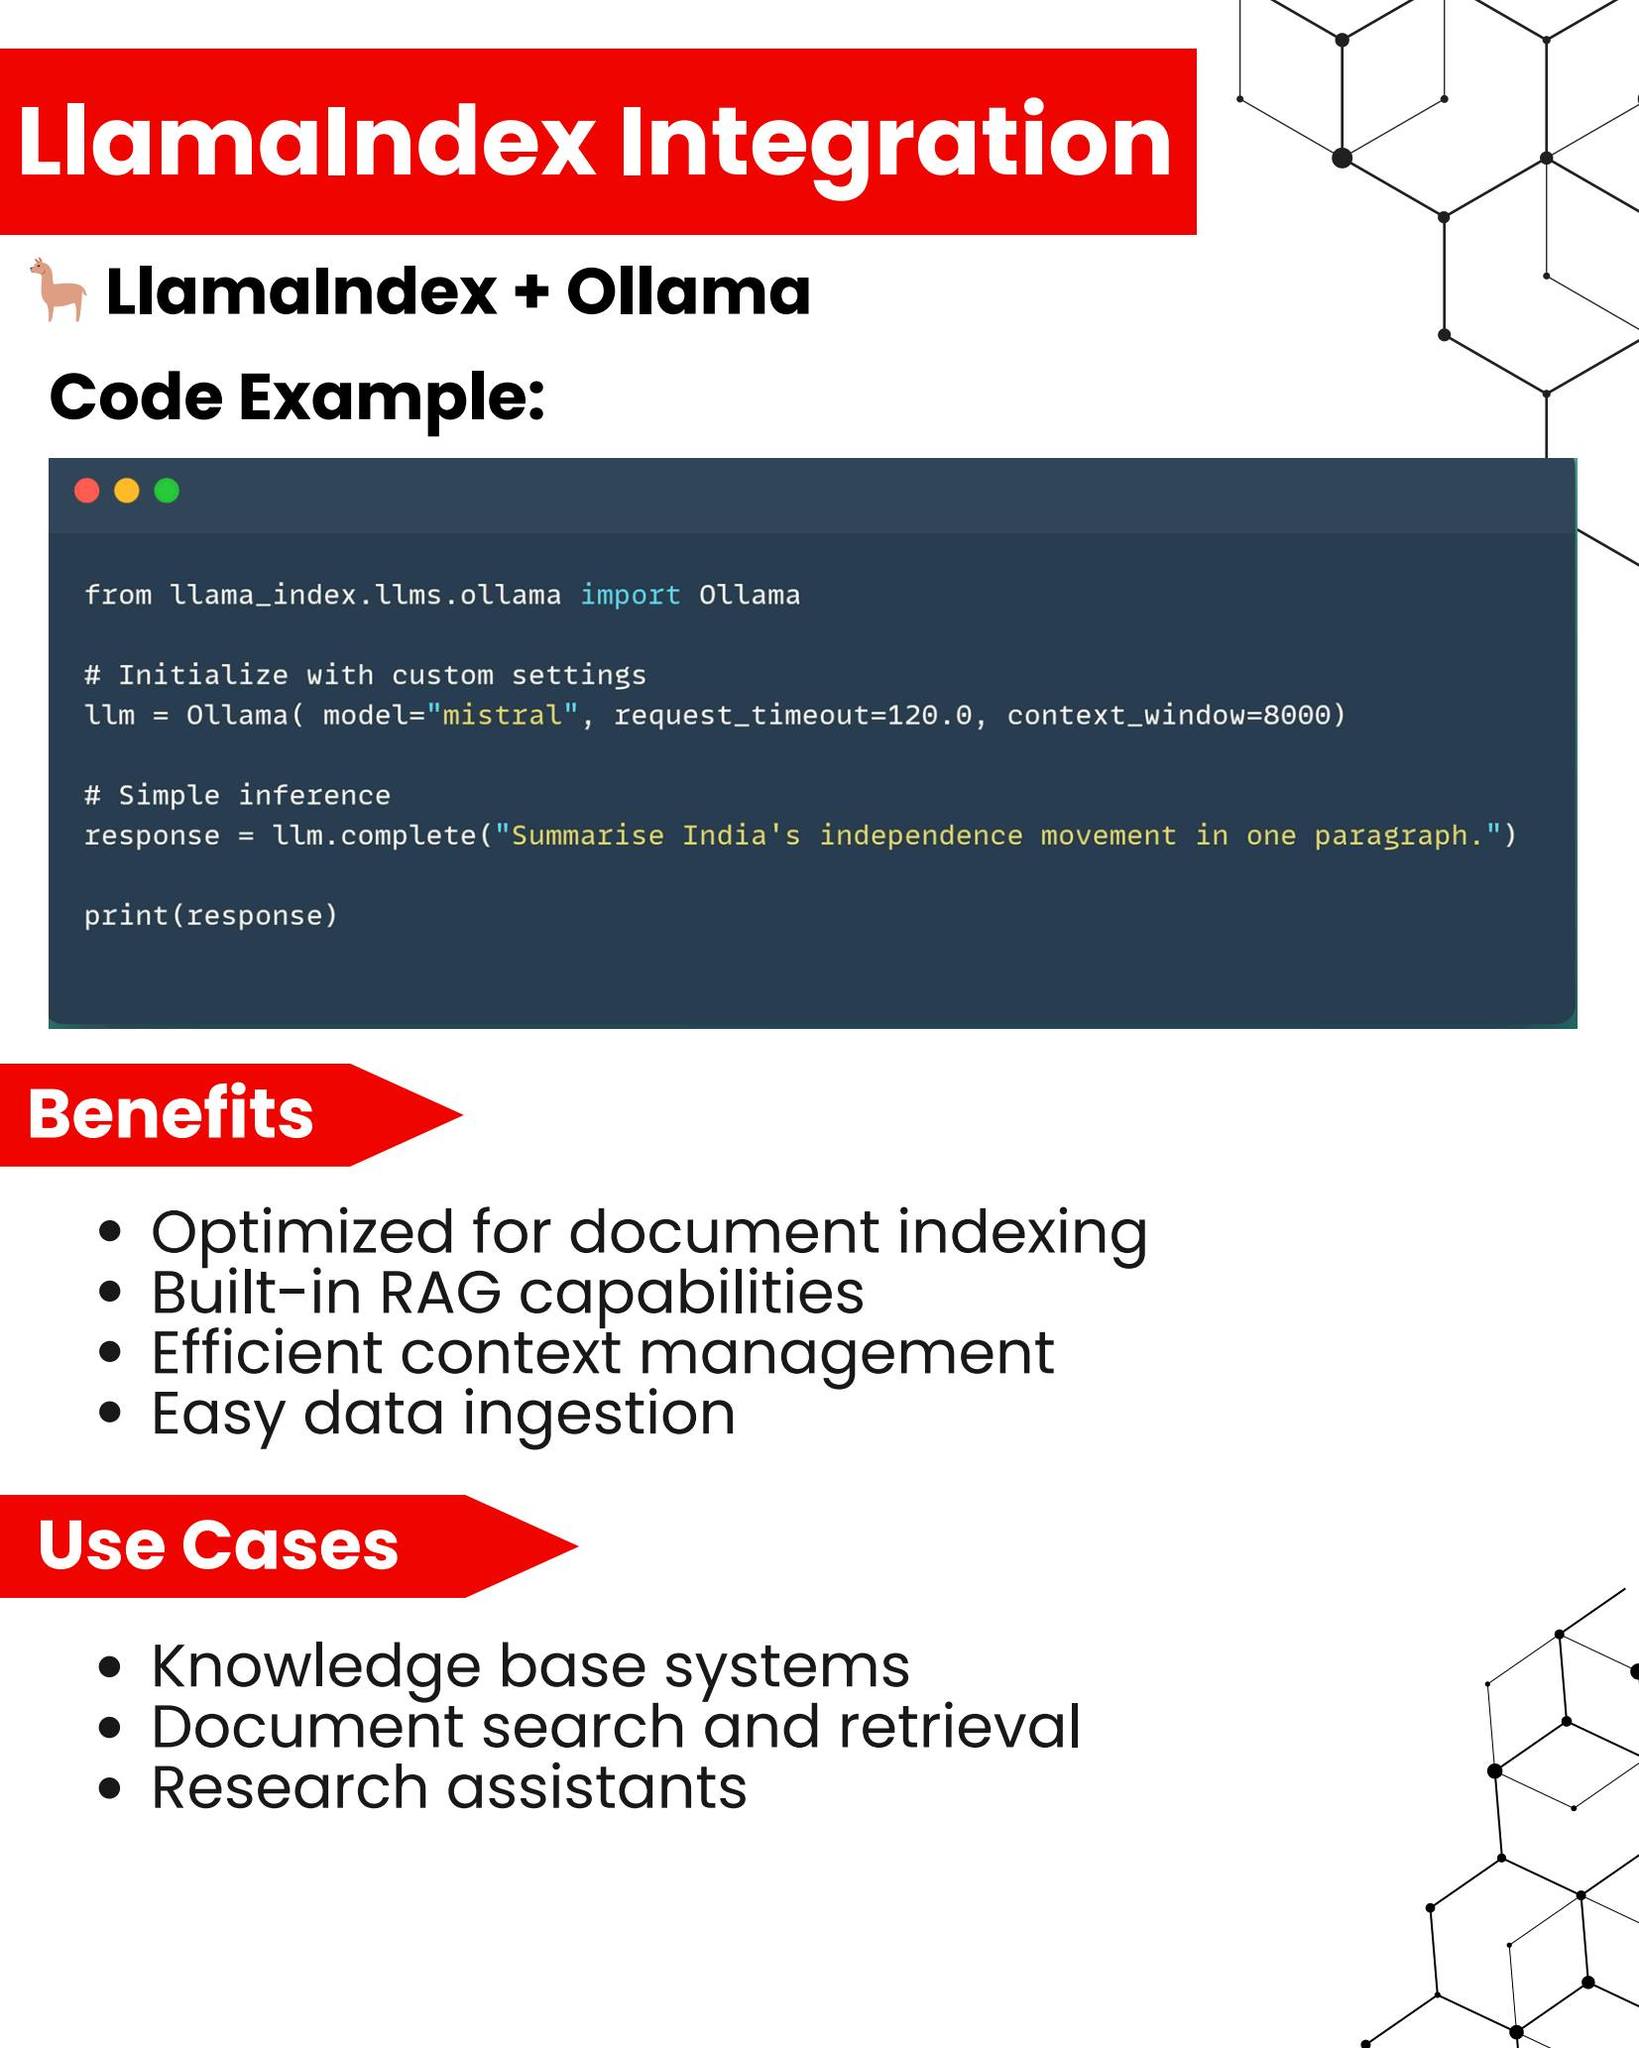
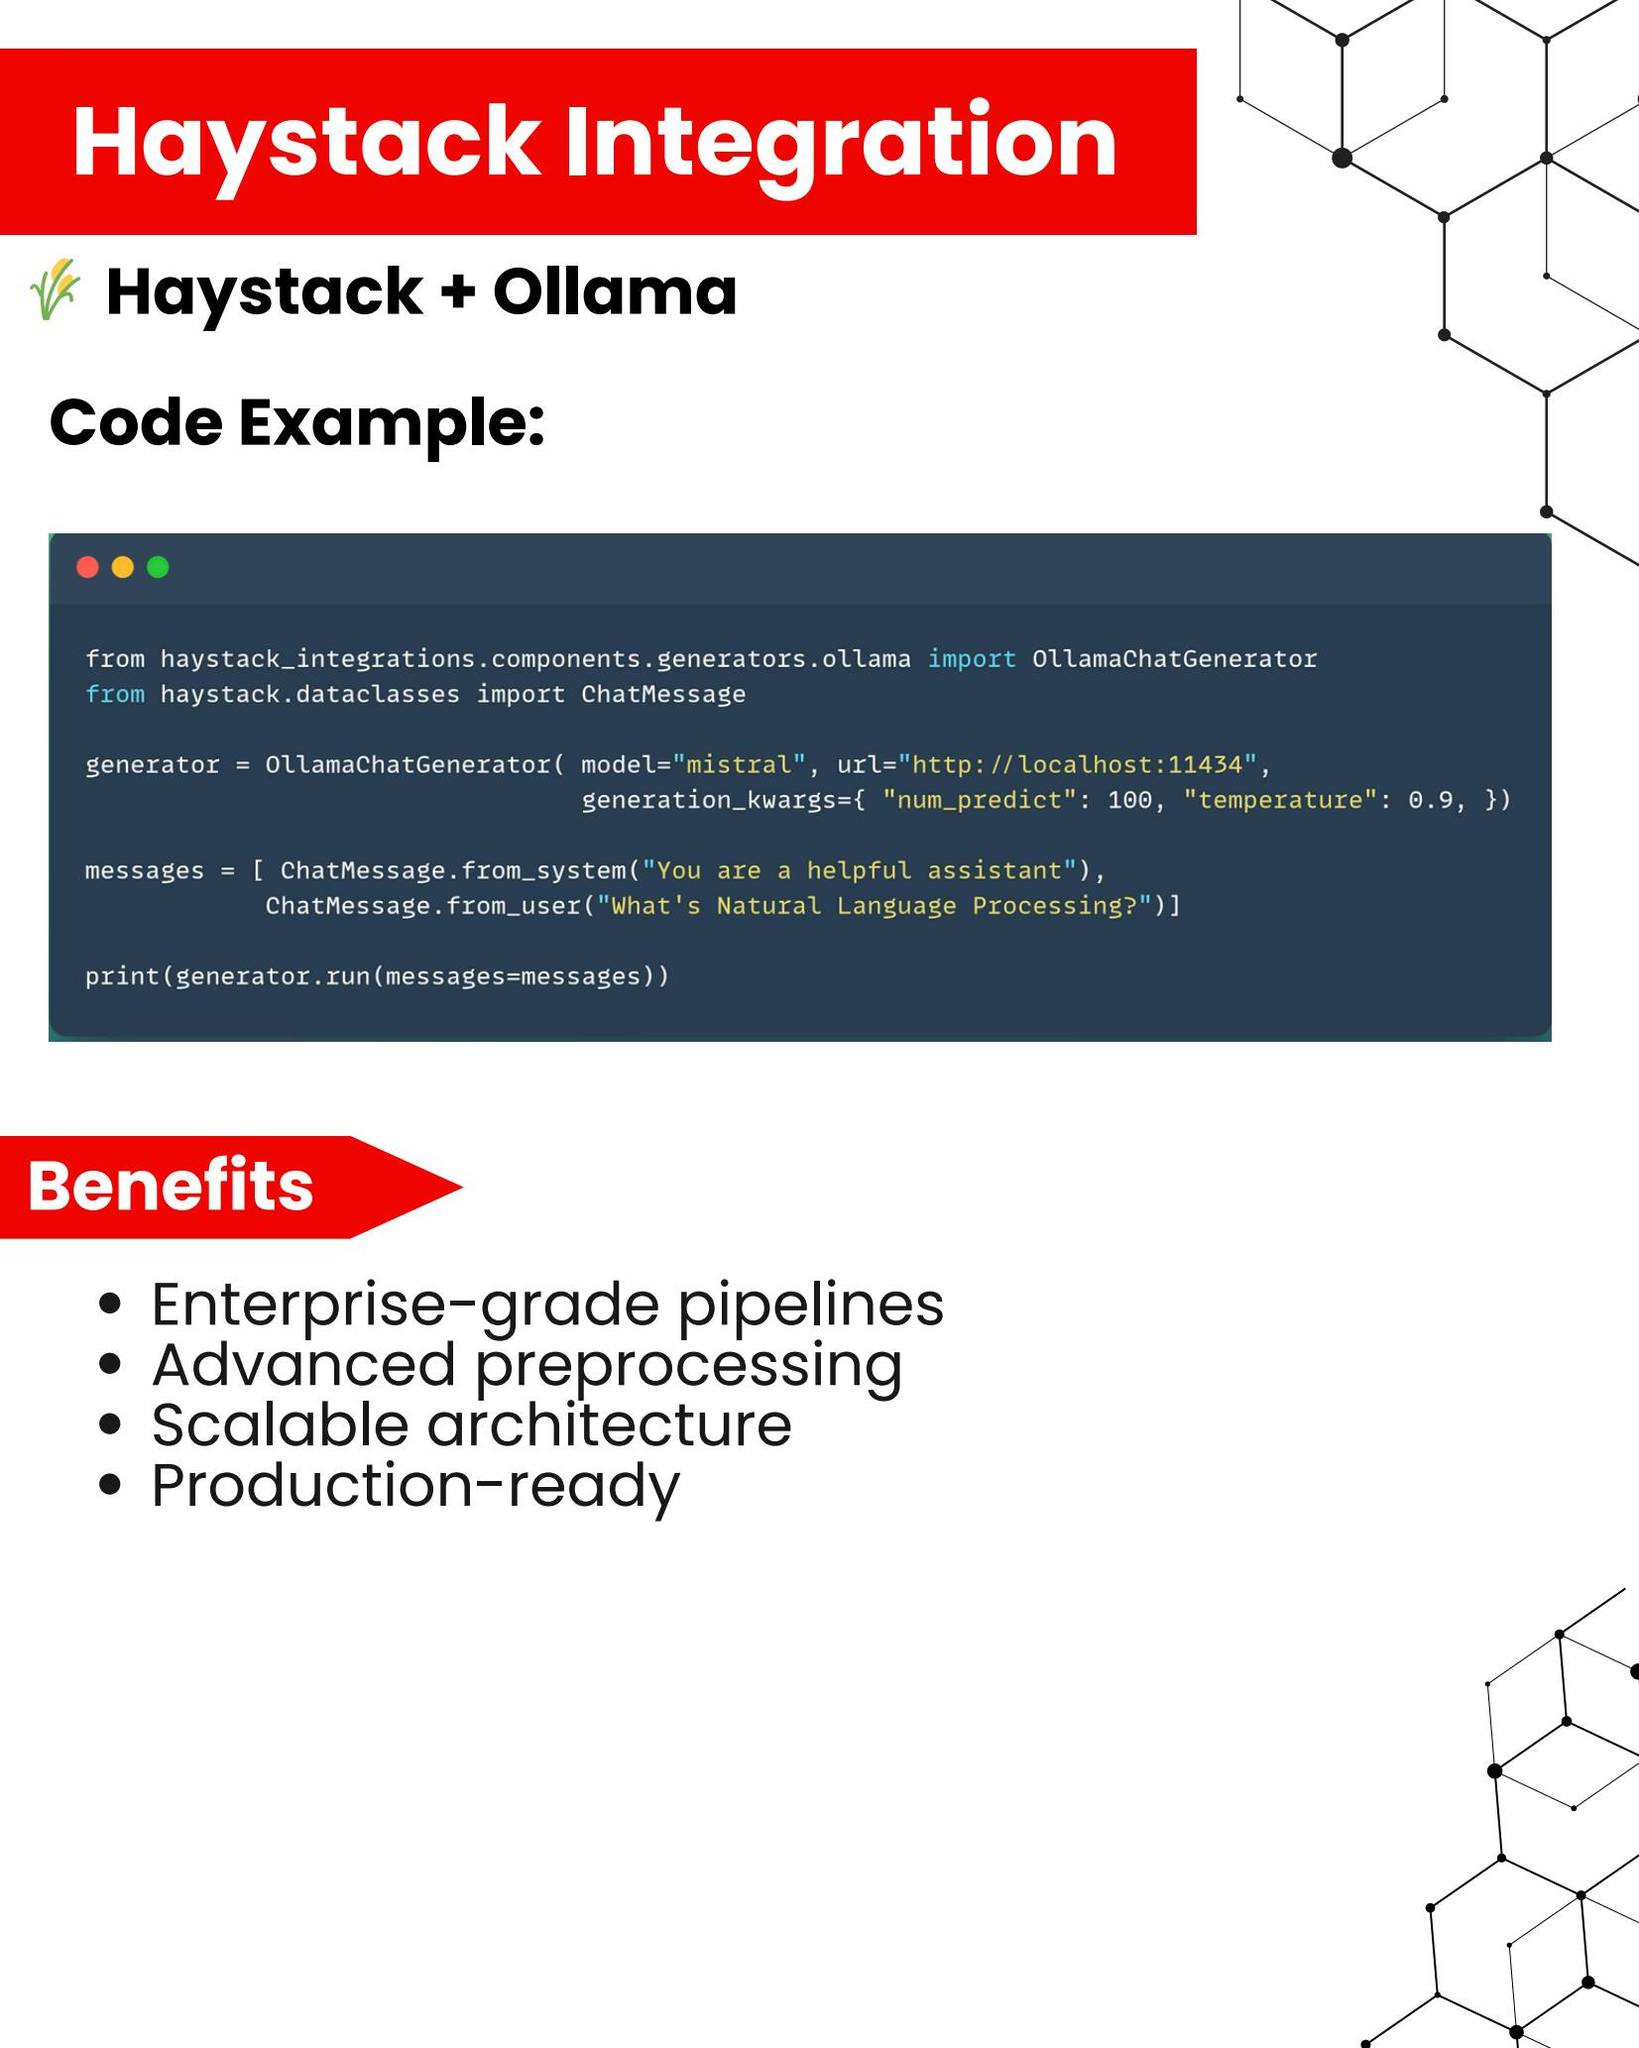
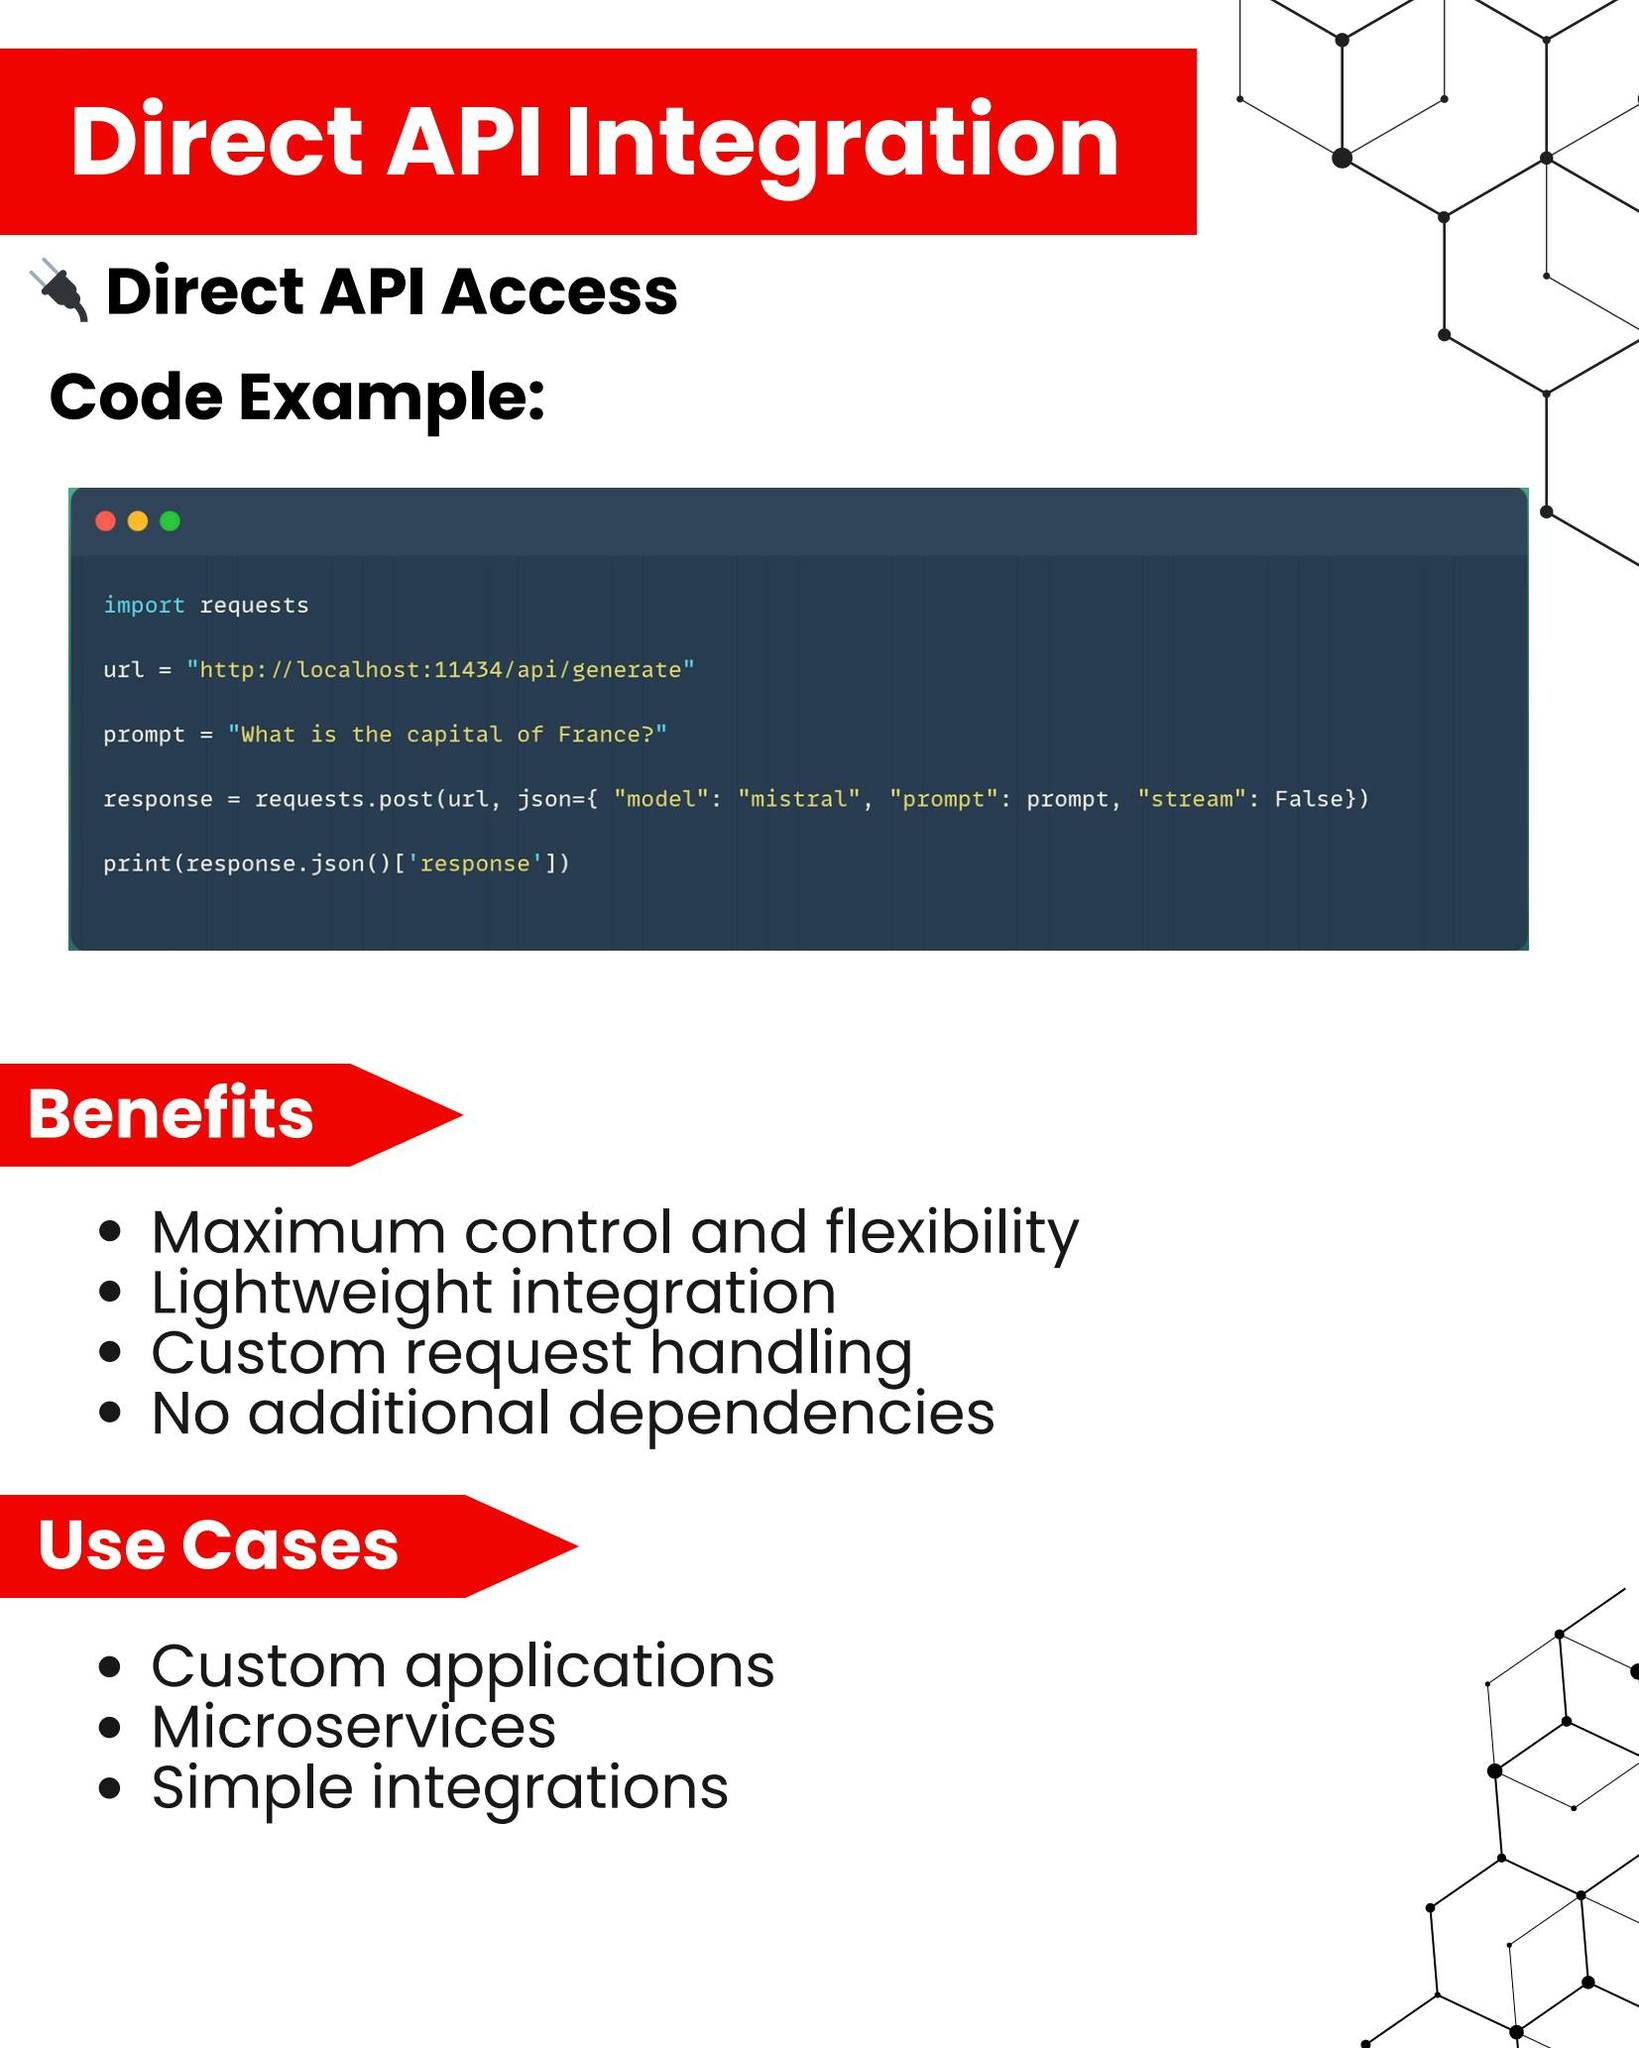
LLMs Localy


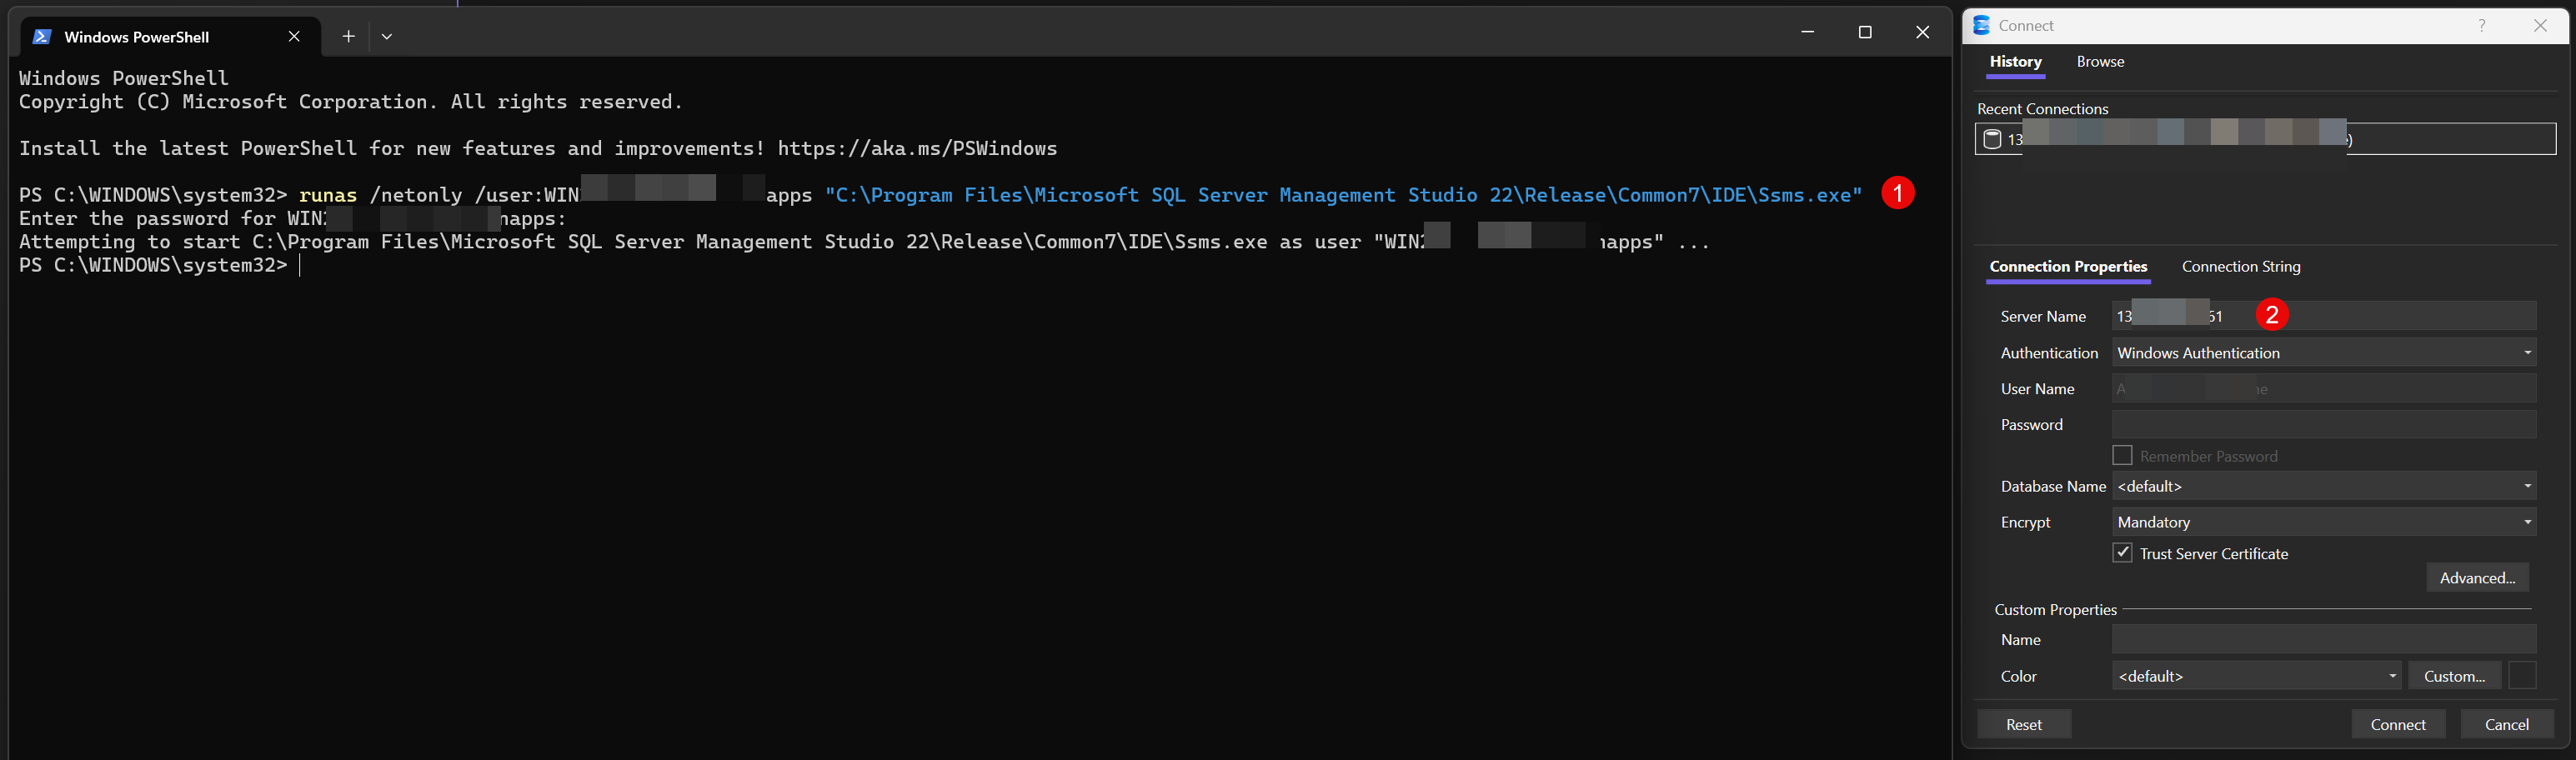
Logon Remote MSSQL via Windows Account
PS C:\WINDOWS\system32> runas /netonly /user:DOMAIN\inon "C:\Program Files\Microsoft SQL Server Management Studio 22\Release\Common7\IDE\Ssms.exe"
Enter the password for DOMAIN\inon:
Attempting to start C:\Program Files\Microsoft SQL Server Management Studio 22\Release\Common7\IDE\Ssms.exe as user "DOMAIN\inon" ...
Server Name: Remote IP Server (keep default ALL)